
>>

A quick no-bake treat that captures the classic Almond Joy flavor — sweet coconut filling, a crunchy almond crown, and a glossy chocolate shell. Ready in under 40 minutes and freezer-friendly.

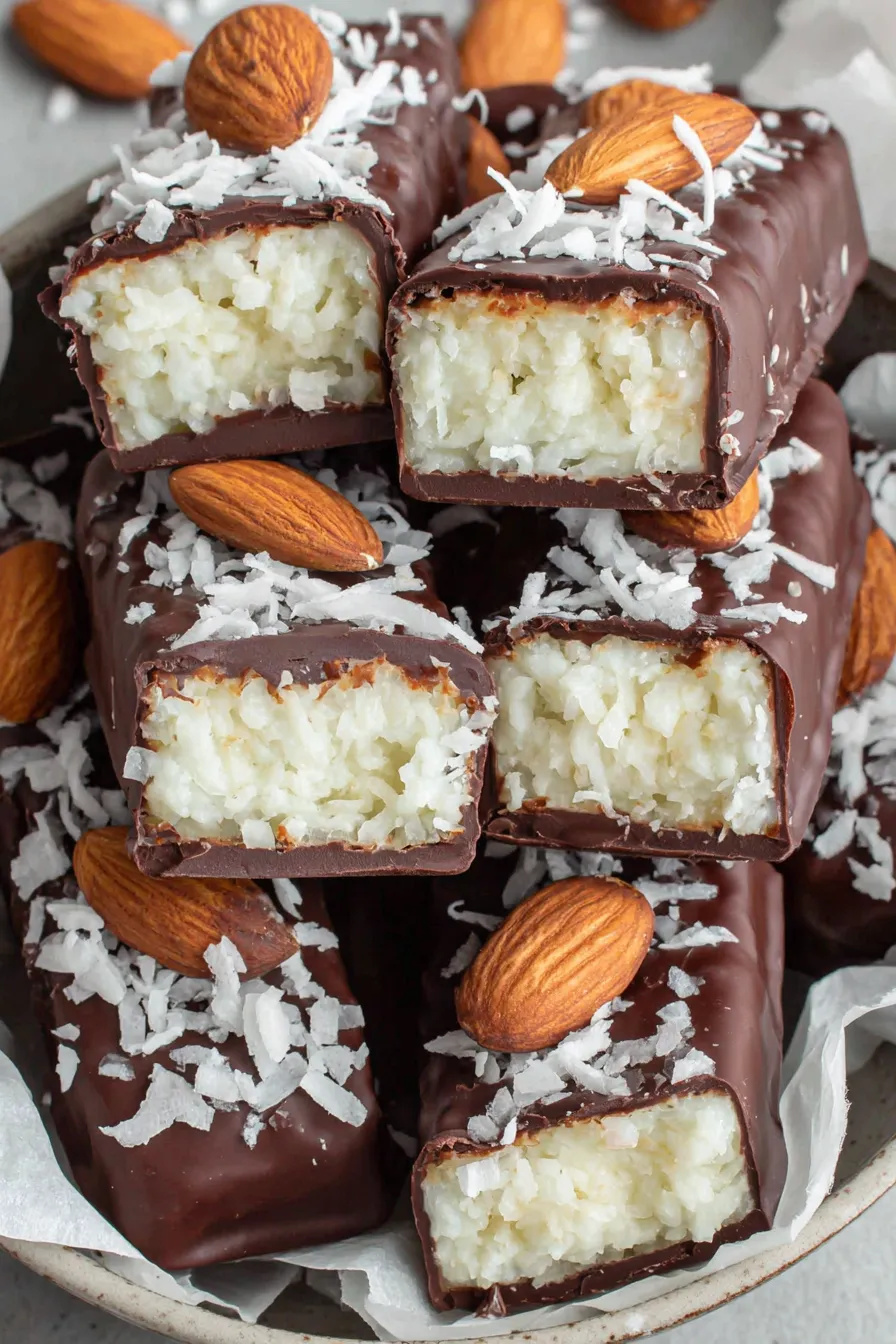
This homemade Almond Joy version has been my guilty-pleasure shortcut for years: a tidy, no-bake candy that delivers the exact contrast I crave — chewy coconut, a single crunchy almond on top, and a snap of chocolate. I first developed this approach one weekend when I wanted to recreate the candy bar textures without fuss or specialty equipment. The method is simple: blend coconut with chilled canned coconut milk and a touch of maple syrup, form logs with your hands, top each with an almond, chill briefly, then coat in melted chocolate. The result is familiar and nostalgic, but fresher and less sweet than store-bought bars.
What makes these worth the small effort is the balance of textures and the freedom to control ingredients. Using unsweetened shredded coconut keeps the filling pleasantly coconut-forward while the maple syrup adds a subtle floral sweetness rather than cloying sugar. Chilled canned coconut milk helps the mixture come together smoothly and keeps the filling creamy without being oily. Once you dip each bar in chocolate, the thin shell firms quickly in the refrigerator, creating that delightful contrast of chewy center and crisp coating. These are ideal for quick gifts, a last-minute dessert, or a healthier pantry-friendly treat to keep on hand.
I remember handing a tray of these out at a neighbors' potluck; the ease of making a dozen in under an hour impressed everyone. My younger cousin declared them the best thing since sliced bread, and a few friends asked for the recipe the same night. They travel well and were the hit of a beach picnic we packed a few weeks later.

What I love most is how reliably these bars satisfy a chocolate-coconut craving without a lengthy bake time. They’ve traveled to picnics, birthday gatherings, and midnight snack raids — every time someone notices that perfect almond on top and asks for another. For me, the simplicity and nostalgia make them a small, joyful ritual.
Store these bars in an airtight container with parchment or wax paper between layers to prevent sticking. Refrigerate for up to 10 days; for longer storage freeze them in a single layer on a baking sheet until solid, then transfer to a freezer-safe zip bag for up to 3 months. To serve from frozen, place bars in the refrigerator for 30–60 minutes to soften slightly — they are best when the center is cool but not rock hard. Avoid storing at room temperature for extended periods, especially in warm weather, as the chocolate coating will soften and the filling may become oily.
If you want a less-sweet profile, use 60–70% dark chocolate and reduce maple syrup to 1 tablespoon. For a vegan-friendly or allergy-safe option, select dairy-free chocolate chips; many brands provide allergen statements if nuts are a concern. Swap almonds for hazelnuts or pecan halves for a different texture and flavor profile — keep the same quantity. If canned coconut milk is unavailable, use 3 tablespoons of coconut cream plus 1/4 cup neutral-flavored coconut yogurt to achieve a similar binding effect, but expect a slightly tangier flavor.
Serve these bars chilled alongside coffee or tea as a petite dessert. For a party platter, arrange with fresh berries and salted nuts to offset sweetness. They make lovely homemade gifts when wrapped individually in parchment and ribbon. For an elevated presentation, drizzle contrasting white or milk chocolate across the top before the coating firms, or sprinkle a pinch of flaky sea salt on each bar right after dipping for a sweet-salty finish.
The flavor combination of coconut, almond, and chocolate is widely enjoyed in American candy traditions, with the Almond Joy bar originating as a popular manufactured candy in the United States. This homemade interpretation nods to that tradition but emphasizes fresher ingredients and less processed sugar. Coconut confections have roots in tropical regions where coconut is abundant, and Western candy-makers adapted these textures into bite-sized treats that became staples in mid-20th-century confectionery.
In summer, swap maple syrup for a lighter agave or reduce to 1 tablespoon and top bars with toasted coconut for a brighter flavor. For winter holidays, fold a pinch of cinnamon and orange zest into the coconut mix for a festive twist and use dark chocolate with 70% cocoa. For Valentine’s Day, press a single freeze-dried raspberry fragment on top of each bar before coating for color and a tart counterpoint.
Make a double batch and portion into small freezer bags for grab-and-go snacks. Pack three bars in a small container for portable dessert portions; they hold up well in an insulated lunchbox. When preparing in advance, freeze logs individually on a tray, then transfer to a bag — dip straight from semi-frozen to reduce melting during coating. Label containers with the date to track freezer life.
These bars are a reliable little pleasure to keep on hand — easy to scale for gifts or gatherings, forgiving in technique, and endlessly adaptable. I encourage you to make them your own: vary the chocolate, try different nuts, or add a pinch of sea salt for a signature touch. Happy dipping!
Chill the coconut mixture until slightly firm before shaping to prevent sticky hands and misshapen bars.
Warm chocolate gently and avoid overheating; microwave in short bursts or use a double boiler for control.
Press almonds firmly into each log before freezing so they stay centered during coating.
If chocolate thickens, stir in 1 teaspoon of neutral oil to restore a glossy, dip-friendly consistency.
Use parchment-lined trays to prevent sticking and make cleanup easy.
This nourishing homemade almond joy bars recipe is sure to be a staple in your kitchen. Enjoy every moist, high protein slice — it is perfect for breakfast or as a wholesome snack any time.
This Homemade Almond Joy Bars recipe makes perfectly juicy, tender, and flavorful steak every time! Serve with potatoes and a side salad for an unforgettable dinner in under 30 minutes.
In a high-speed blender or food processor, combine the unsweetened shredded coconut, chilled canned coconut milk, and maple syrup. Pulse until the mixture is cohesive and slightly sticky (about 30–45 seconds), scraping down the sides as needed.
Using slightly damp hands, divide the mixture into 12 portions and form into rectangular logs. Place them on a parchment-lined plate and press an almond into the top of each log.
Freeze the logs on the plate for 15 minutes to firm the centers and make dipping easier. Do not skip this step to avoid deformation during coating.
Melt the chocolate chips in a microwave-safe bowl in 20-second bursts, stirring between each, or melt over a double boiler. Stir until smooth and add 1 teaspoon neutral oil if too thick.
Use two forks to dip each chilled bar into the melted chocolate until fully coated. Tap off excess and return to the lined plate. Refrigerate for 10–15 minutes until the chocolate is set.
Last Step: Please leave a rating and comment letting us know how you liked this recipe! This helps our business to thrive and continue providing free, high-quality recipes for you.
Leave a comment & rating below or tag
@yumelle on social media!

Juicy chicken meatballs baked with Parmesan and herbs, spooned with marinara, and covered in melty mozzarella on toasted slider rolls. Irresistible for parties.

Twirl eerie-colored spaghetti and top it with gooey, cheese-stuffed monster meatballs complete with olive eyes for a delightfully spooky family dinner.

Silky egg ribbons swirl through savory chicken broth, scented with sesame and scallions. Simple pantry staples, ready in just 10 minutes.
Leave a comment & rating below or tag @yumelle on social media!
Enjoyed this recipe? Share it with friends and family, and don't forget to leave a review!
This recipe looks amazing! Can't wait to try it.
Comments are stored locally in your browser. Server comments are displayed alongside your local comments.

Join to receive our email series which contains a round-up of some of our quick and easy family favorite recipes.
