
Christmas Oreo Tree Cookies

Festive Oreo cookies decorated as tiny Christmas trees — a quick, crowd-pleasing holiday treat that's perfect for parties, cookie exchanges, and last-minute decorating fun.

This little holiday treat started as a playful experiment one December evening when I wanted something quick, pretty, and undeniably festive for a last-minute cookie exchange. Using familiar ingredients from my pantry and a few seasonal decorations, I transformed simple sandwich cookies into tiny evergreen trees that felt special without requiring hours in the kitchen. The result is a set of crunchy, chocolatey bases topped with smooth white and green chocolate, finished with candy stars. They look like they took longer to make than they actually do, which always delights guests.
I discovered this method while prepping treats with my niece; she loved the decorating step and I loved how fast the cookies set so we could pack them for neighbors that same evening. The contrast of the crisp Oreo center and the creamy coating gives each bite a satisfying snap and melt. These cookies are playful enough for kids to decorate and polished enough to make an attractive platter. They’ve become my go-to when I need something that travels well, stores easily, and still reads as festive on a dessert table.
Why You'll Love This Recipe
- Ready in about 30 minutes from start to finish, so it’s ideal for last-minute trays, cookie swaps, or school bake sales without stress.
- Uses pantry staples like sandwich cookies and melting wafers; you can usually assemble everything in one quick shopping trip.
- Kid-friendly decorating step that doubles as a fun holiday activity; piping a simple tree shape is forgiving and creative.
- Make-ahead friendly: the cookies set quickly and keep well for several days in an airtight container, making prep simple for busy hosts.
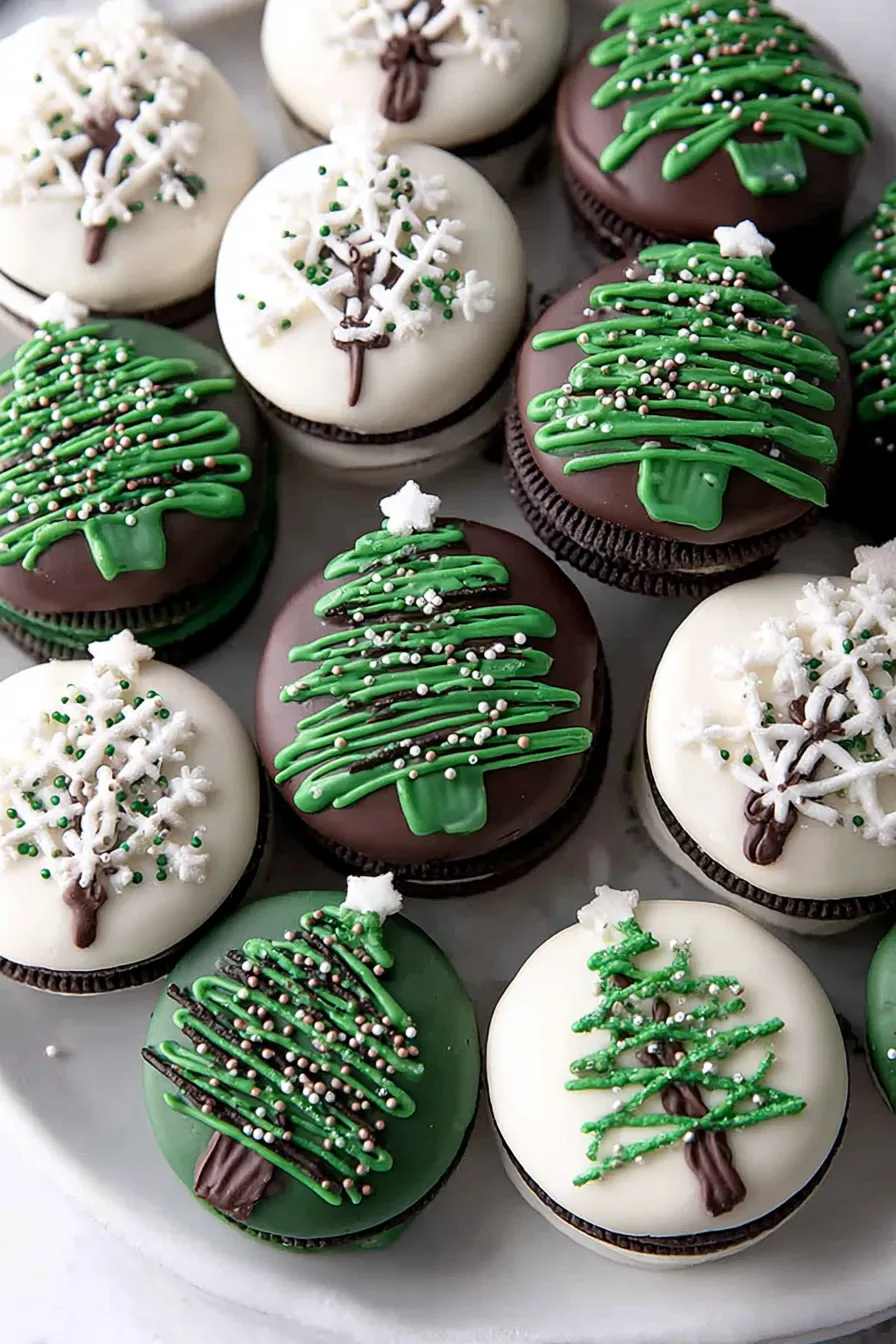
- Customizable: swap colors, use dark or milk chocolate bases, or add sprinkles for different themes and occasions.
- Minimal equipment required: just a microwave, parchment paper, and a small piping bag or resealable bag for shaping the tree.
In my experience these are always the first cookies to disappear at gatherings. My sister told me she boxed a dozen for co-workers and they loved both the taste and the cute presentation. Decorating with a small group makes memories — one year my nephew insisted on adding extra stars to every cookie, and those ended up being the most requested.
Ingredients
- Oreos (15 cookies): Standard sandwich cookies provide the crunchy, familiar base. Choose regular or double-stuffed depending on how indulgent you want the bite. I usually use the original brand for consistent shape.
- White melting chips (6 ounces): These give a glossy, smooth coating that sets firmly. Look for real confectionery melts or candy coating like Ghirardelli or Wilton brands for predictable melting.
- Green melting wafers (3 ounces): Pre-colored wafers make piping simple and yield bright tree color without food coloring. Choose a quality melting wafer for smooth flow.
- Candy star toppers (15 pieces): Tiny edible stars finish each tree and add a sparkling focal point. Use sugar stars or metallic-coated toppers depending on the occasion.
- Chocolate jimmies (1/4 cup; optional): A handful of brown jimmies creates a simple trunk beneath each tree. Use mini chocolate sprinkles or chopped chocolate if you prefer a thicker trunk.
Instructions
Prepare the Work Surface: Line a baking sheet with parchment paper and set it near your microwave. Having cookies within arm’s reach prevents drips and speeds assembly. This step takes about 2 minutes and prevents sticking as coatings harden. Melt the White Coating: Place 6 ounces of white melting chips in a microwave-safe bowl. Heat for 30 seconds on medium power and stir thoroughly. Continue heating in 15 to 20 second bursts, stirring between sessions, until the chocolate is smooth and pourable. Avoid overheating; stop when small lumps remain — stirring will finish the melt. Total time is usually 60 to 90 seconds depending on your microwave. Dip the Cookies: Hold each Oreo by the edge and dip roughly halfway into the melted white coating so the top half remains exposed for the green tree. Tap gently on the bowl edge to remove excess, then lay the dipped cookies on the prepared parchment. Work quickly while the coating is warm but not too hot to handle. Allow a thin film to set for about 5 minutes before decorating so the green chocolate sits on a slightly firm base. Melt the Green Wafers: In a clean microwave-safe bowl, melt 3 ounces of green wafers using the same technique: 30 seconds then stir, followed by short bursts until smooth. If the wafers are thick, add a tiny teaspoon of neutral oil to improve flow. Transfer the melted green coating into a piping bag or a small resealable plastic bag and snip a 2 to 3 millimeter corner for controlled lines. Pipe the Tree Shape: Using a back-and-forth motion, draw a triangular tree shape on the white-coated portion of each cookie. Start at the top and work downward with slightly wider strokes to create layers like branches. Keep your hand steady and apply consistent pressure for even ribbons of green. If a line is too thick simply smooth lightly with the tip of a toothpick before the coating sets. Add Toppers and Trunk: Immediately place a candy star at the top of each tree; press gently so it adheres. For the trunk, press chocolate jimmies along the bottom edge of the green triangle or pipe a short brown line using melted chocolate. Let all decorated cookies sit undisturbed until fully set, about 15 to 20 minutes at room temperature, or place them in the refrigerator for 8 to 10 minutes to speed setting.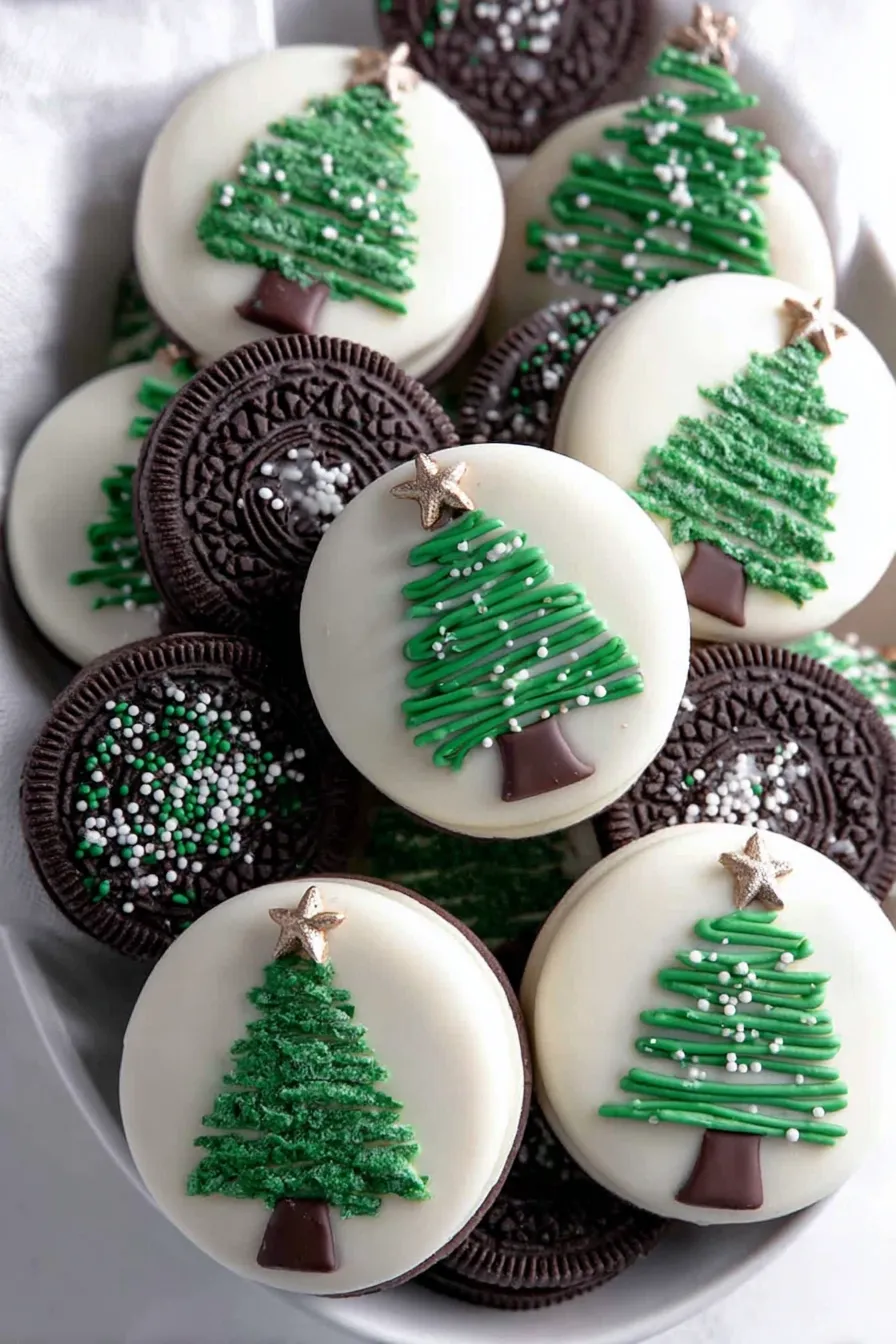
You Must Know
- These treats keep well in an airtight container at room temperature for up to 3 days; refrigerate for up to 7 days but expect the coating to sweat slightly when brought back to room temperature.
- They travel well — stack cookies between sheets of parchment inside a sturdy tin for gifting or postal-safe packaging for local deliveries.
- Set time is quick: 15 to 20 minutes at room temperature, or 8 to 10 minutes refrigerated if you need them firmed fast for packaging.
- Contains common allergens: dairy in white coating and wheat in sandwich cookies — avoid if you have sensitivities.
My favorite part is watching the decorating station light up when kids get involved. Once, during a neighborhood cookie swap, everyone begged for an extra bag because they enjoyed decorating as much as eating them. That hands-on element makes these a hit at gatherings and doubles as a mini activity for holiday parties.
Storage Tips
Store finished cookies in a single layer or with parchment between layers inside an airtight container to avoid scuffing the decoration. At room temperature in a cool, dry pantry keep them for up to three days. If you need longer storage, refrigerate for up to one week; allow cookies to come back to room temperature for 20 to 30 minutes before serving to reduce surface condensation. For freezing, arrange cookies in a single layer on a tray until firm, then stack with parchment separators and freeze in a rigid container for up to two months. Thaw in the refrigerator overnight to minimize moisture on the coating.
Ingredient Substitutions
If you prefer a darker contrast, substitute white melting chips with milk or dark chocolate and pipe the tree in green candy melt as described. For a dairy-free version look for vegan sandwich cookies and dairy-free white coating made from coconut or specialty brands; note that texture and set times will vary slightly. Swap candy stars for silver dragees or colored nonpareils for different looks — use small sprinkles as an alternative trunk if chocolate jimmies are unavailable. If you want a sturdier trunk, pipe a small rectangle of chocolate onto parchment, chill until firm, then adhere to the cookie with a dab of melted chocolate.
Serving Suggestions
Arrange the cookies on a festive platter with sprigs of rosemary or evergreen for a woodland look that complements the tree motif. Pair them with hot chocolate, eggnog, or spiced coffee for a cozy dessert pairing. For holiday parties, set up a decorating station with extra colored melts, edible glitter, and mini candies so guests can personalize a cookie. For a grown-up twist serve alongside a cheese board where the cookies provide a sweet contrast to sharp cheeses and dried fruits.
Cultural Background
The practice of transforming simple sweets into festive shapes is a hallmark of many holiday baking traditions where appearance is as important as flavor. Turning sandwich cookies into miniature trees borrows from the larger tradition of decorated confections in North American holiday culture: small, playful desserts that are easy to distribute and visually tied to seasonal motifs. This modern approach reflects the spirit of cookie swaps and community baking that became popular in the 20th century and continues to evolve with quick, creative techniques like candy melts and pre-made cookie bases.
Seasonal Adaptations
Switch colors and toppers to match other holidays: use pastel melts and tiny bunnies for spring, orange and black wafers with candy eyes for Halloween, or red and green for Christmas. For winter parties add edible shimmer or a dusting of powdered sugar to simulate snow. Incorporate seasonal flavors into the coating by choosing peppermint-flavored white chocolate or adding a pinch of espresso powder to develop a mocha undertone. These small tweaks allow the same technique to serve many celebrations throughout the year.
Meal Prep Tips
Prepare components ahead: melt and store the white coating in a warm thermos to keep it pourable for dipping, and remelt the green wafers in short bursts when ready to pipe. Pre-portion toppings into small bowls for quick assembly. If making many batches, set up an assembly line with one person dipping while another pipes and a third places toppers. This reduces downtime and keeps the workflow smooth. Label containers with dates if storing for gifting so you track freshness easily.
There’s a simple joy in turning familiar ingredients into something festive and shared. Whether you make a dozen for family or a tray for a workplace party, these tiny evergreen cookies bring quick charm and satisfy a sweet tooth without demanding a lot of time. Enjoy the decorating as much as the gifting, and make it your own with colors and toppers that match your holiday spirit.
Pro Tips
Work on a parchment-lined tray to prevent sticking and make cleanup easy.
Heat white and green coatings in short bursts, stirring well to avoid overheating and graininess.
If piping is difficult, use a toothpick to nudge lines into shape before the coating sets.
Keep a small bowl of warm water nearby to dip and clean the piping tip for consistent lines.
This nourishing christmas oreo tree cookies recipe is sure to be a staple in your kitchen. Enjoy every moist, high protein slice — it is perfect for breakfast or as a wholesome snack any time.
FAQs about Recipes
How long will the decorated cookies stay fresh?
Yes. Place cookies in an airtight container layered with parchment and refrigerate up to one week. Bring to room temperature before serving to reduce condensation.
How do I melt the candy wafers without seizing them?
Use a microwave-safe bowl and heat in short bursts, stirring between each burst to prevent burning.
Tags
Christmas Oreo Tree Cookies
This Christmas Oreo Tree Cookies recipe makes perfectly juicy, tender, and flavorful steak every time! Serve with potatoes and a side salad for an unforgettable dinner in under 30 minutes.
Ingredients
Cookies
Chocolate and Decorations
Instructions
Prepare the Pan
Line a baking sheet with parchment paper and set it aside to keep the cookies from sticking during decorating.
Melt White Chocolate
Place 6 ounces of white melting chips in a microwave-safe bowl. Heat for 30 seconds, stir, then heat in 15 to 20 second bursts until smooth and fully melted.
Dip Oreos
Dip each Oreo halfway into the melted white chocolate, tap off excess, and place on the prepared parchment-lined pan to set slightly before piping the tree.
Melt Green Wafers
Melt 3 ounces of green wafers in a separate microwave-safe bowl using the same short-burst method until fully smooth. Transfer to a piping bag or resealable bag.
Decorate Trees
Pipe a tree shape over the white-coated portion using a back-and-forth motion. Place a candy star at the top and press chocolate jimmies beneath for the trunk.
Set and Serve
Allow decorated cookies to set at room temperature for 15 to 20 minutes or refrigerate for 8 to 10 minutes until firm. Serve or pack in an airtight container.
Last Step: Please leave a rating and comment letting us know how you liked this recipe! This helps our business to thrive and continue providing free, high-quality recipes for you.
Nutrition
Did You Make This?
Leave a comment & rating below or tag
@yumelle on social media!
Categories:
You might also like...

Chicken Parmesan Meatball Sliders
Juicy chicken meatballs baked with Parmesan and herbs, spooned with marinara, and covered in melty mozzarella on toasted slider rolls. Irresistible for parties.

Spooky Spaghetti Monster Meatballs
Twirl eerie-colored spaghetti and top it with gooey, cheese-stuffed monster meatballs complete with olive eyes for a delightfully spooky family dinner.

10-Minute Egg Drop Soup
Silky egg ribbons swirl through savory chicken broth, scented with sesame and scallions. Simple pantry staples, ready in just 10 minutes.
Did You Make This?
Leave a comment & rating below or tag @yumelle on social media!
Rate This Recipe
Share This Recipe
Enjoyed this recipe? Share it with friends and family, and don't forget to leave a review!
Comments (1)
This recipe looks amazing! Can't wait to try it.
Comments are stored locally in your browser. Server comments are displayed alongside your local comments.

Hi, I'm Hannah!
What's Popular

30-Minute Meals!
Join to receive our email series which contains a round-up of some of our quick and easy family favorite recipes.