
>>

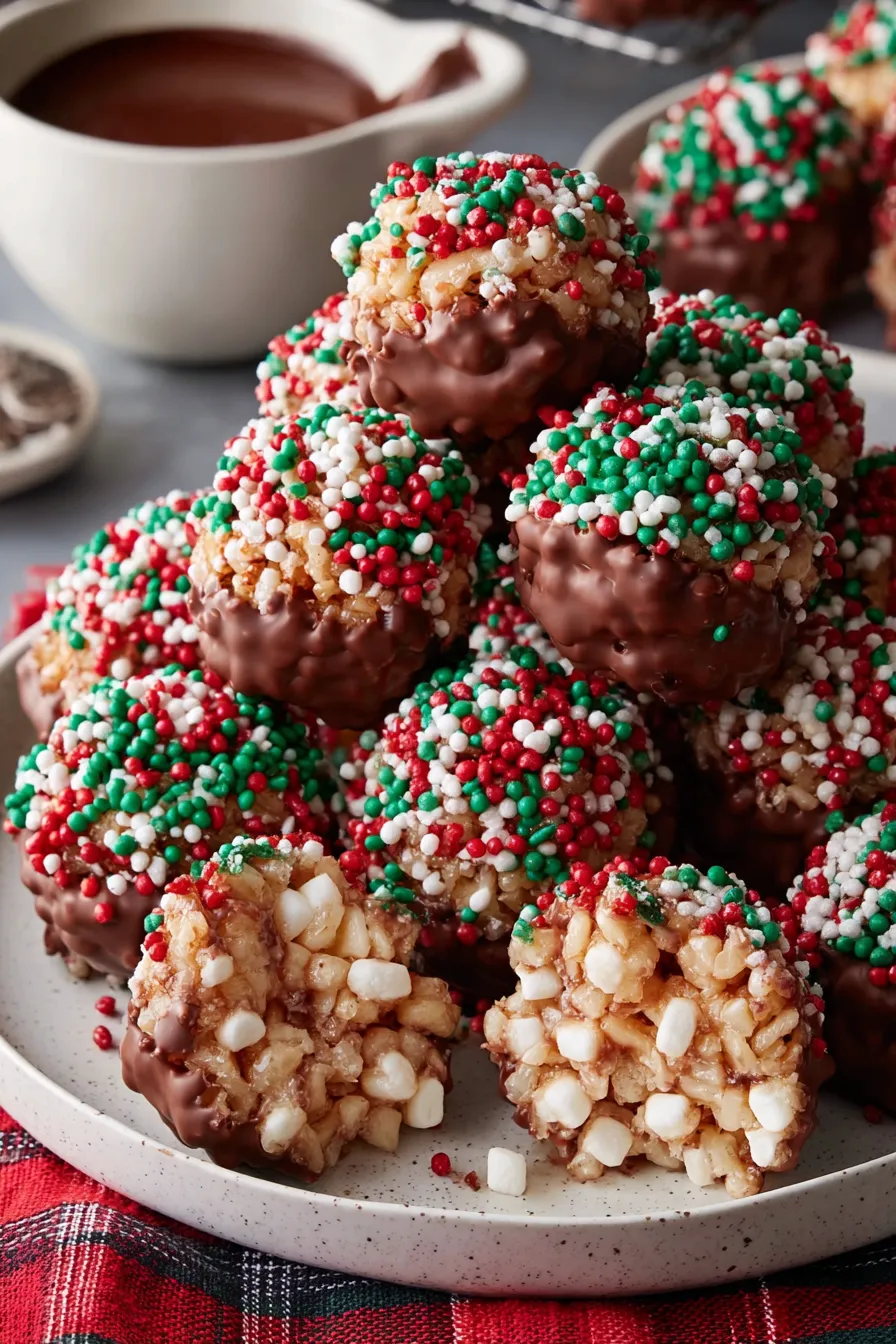
Festive, no-bake chocolate-coated rice krispie balls decorated with red, green, and white sprinkles — a quick, crowd-pleasing holiday treat.

This little festive treat has been our go-to for holiday cookie exchanges and last-minute hostess gifts for years. I first discovered this combination on a snowy December afternoon when I wanted something quicker than baking but still seasonal and cheerful. The combination of pillowy marshmallow, crisp rice cereal, and a glossy milk chocolate coating topped with red, green, and white jimmies hits nostalgic notes while looking polished enough for any celebration. Every time I bring these to a gathering, they vanish within minutes.
The texture is the real star: a soft, marshmallow-forward interior that gives way to a thin chocolate shell that snaps gently. The cereal keeps each bite light and airy, so you get the sensation of a cookie without the oven. I love that these are entirely no-bake, family-friendly to make, and easy to adapt for dietary needs. My kids insist on helping roll and sprinkle, and one year my neighbor told me she keeps a tray hidden for midnight snacking. They are simple to make ahead and store well, which makes them perfect for festive busy weeks.
In my experience these treats please every age group. One Thanksgiving I prepared three batches in different coatings and the chocolate one was the first to disappear. The recipe scales easily, so if you need more for a crowd double the quantities and use a larger mixing bowl and baking sheet.
My favorite thing about these is how the chocolate shell transforms the humble rice krispie into something festive and gift-ready. One year I wrapped a dozen in parchment and ribbon and gave them away as teacher gifts; the recipients loved the simple elegance and the smell of chocolate that greeted them as soon as they opened the package.

Store finished treats in an airtight container lined with parchment to prevent sticking and condensation. If your home is warm, keep them refrigerated; otherwise room temperature is fine for 3 to 4 days. For longer storage, freeze individually on a tray until firm, then transfer to a freezer-safe container. Thaw overnight in the refrigerator to avoid sweating before serving. When transporting, keep them chilled in an insulated bag or cooler to prevent the chocolate from melting.
You can swap milk chocolate chips for dark chocolate to cut sweetness or use white chocolate for a different look. If you need dairy-free, choose dairy-free chocolate chips and a plant-based spread instead of butter. For a gluten-free preparation, confirm the cereal is labeled gluten-free; some brands use malt barley. If you want extra flavor, stir a teaspoon of vanilla extract into the melted marshmallows, or add 1/2 teaspoon ground cinnamon for a warm note.
Serve on a platter lined with festive paper or in individual cellophane bags tied with ribbon for gifting. Pair with mulled cider or hot chocolate at a holiday table. For a dessert board, include different coatings and colors, such as crushed candy cane on some and toasted coconut on others, to create contrast and variety. Garnish with a light dusting of edible glitter for parties with kids.
Rice cereal treats are a classic American no-bake confection that trace their popularity to mid-20th century convenience cooking when marshmallows and processed cereals became pantry staples. Decorating them for holidays is a modern twist that turns a nostalgic snack into a celebration treat. Their simplicity and adaptability have made them a staple at holiday potlucks across the United States.
Switch sprinkles to match any holiday or season: orange and black for Halloween, pastels for spring, or gold and white for New Year. Swap mint chips in the coating for a peppermint variation at Christmas, or fold finely chopped toasted nuts into the cereal mixture for autumnal texture. Warming spices like ginger and nutmeg play nicely with dark chocolate in winter variations.
Make the marshmallow-cereal mixture and form balls a day ahead, keeping them chilled in a single layer. Melt and temper chocolate on the day you plan to serve, then dip and garnish. If you need many, enlist helpers for dipping and decorating assembly-line style. Use a small ice cream scoop to ensure uniformly sized portions and faster rolling.
These chocolate-coated rice krispie balls are simple, nostalgic, and endlessly adaptable. Whether you make them for a rowdy holiday cookie swap or a quiet evening snack with hot cocoa, they bring cheerful flavor and a sense of handmade warmth. Give them a try, experiment with coatings, and make them your own.
Lightly butter your hands or use a spray oil when rolling to prevent sticking and speed up shaping.
Chill formed balls before dipping to reduce breakage and keep the shape intact while coating.
Use a fork to dip and tap gently to remove excess chocolate for a thin, even shell.
Flash-freeze coated balls on the sheet before transferring to a container to prevent sticking.
This nourishing christmas chocolate rice krispie balls recipe is sure to be a staple in your kitchen. Enjoy every moist, high protein slice — it is perfect for breakfast or as a wholesome snack any time.
This Christmas Chocolate Rice Krispie Balls recipe makes perfectly juicy, tender, and flavorful steak every time! Serve with potatoes and a side salad for an unforgettable dinner in under 30 minutes.
Line a large rimmed baking sheet with parchment paper and set aside so coated pieces have a place to set.
In a large saucepan over low heat, melt 3 tablespoons unsalted butter. Add 4 cups miniature marshmallows or 40 large marshmallows and stir constantly until fully melted and smooth, about 3 to 4 minutes. Keep heat low to avoid scorching.
Remove from heat and stir in a pinch of salt. Add 6 cups crispy rice cereal and fold gently until evenly coated, taking care not to overmix.
Allow mixture to cool for 5 minutes. Lightly butter hands and roll into 1.5 to 2 inch balls, placing them on the prepared baking sheet.
Refrigerate the formed balls for 15 to 20 minutes until firm enough to dip without falling apart.
Set up a double boiler and melt 2 cups milk chocolate chips with 1 tablespoon coconut oil, stirring until smooth and glossy. Keep warm over low heat.
Dip each chilled ball into melted chocolate using a fork, tap off excess, place back on parchment, and immediately sprinkle with red, green, and white jimmies while chocolate is wet.
Refrigerate for 30 minutes until chocolate sets. Store in an airtight container in the refrigerator up to one week or at room temperature for 3 to 4 days.
Last Step: Please leave a rating and comment letting us know how you liked this recipe! This helps our business to thrive and continue providing free, high-quality recipes for you.
Leave a comment & rating below or tag
@yumelle on social media!

Juicy chicken meatballs baked with Parmesan and herbs, spooned with marinara, and covered in melty mozzarella on toasted slider rolls. Irresistible for parties.

Twirl eerie-colored spaghetti and top it with gooey, cheese-stuffed monster meatballs complete with olive eyes for a delightfully spooky family dinner.

Silky egg ribbons swirl through savory chicken broth, scented with sesame and scallions. Simple pantry staples, ready in just 10 minutes.
Leave a comment & rating below or tag @yumelle on social media!
Enjoyed this recipe? Share it with friends and family, and don't forget to leave a review!
This recipe looks amazing! Can't wait to try it.
Comments are stored locally in your browser. Server comments are displayed alongside your local comments.

Join to receive our email series which contains a round-up of some of our quick and easy family favorite recipes.
