
>>

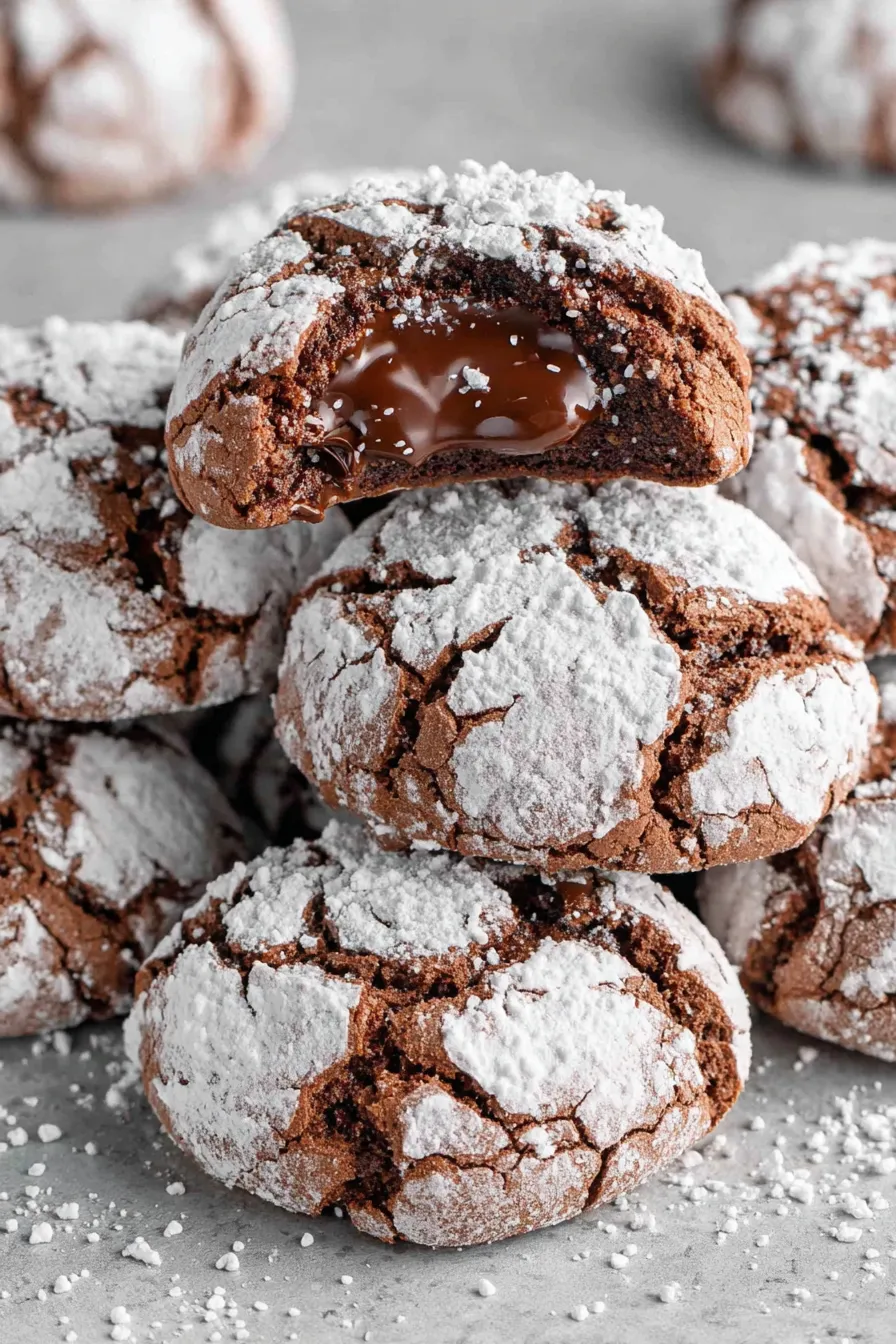
Soft, fudgy cookies with a glossy chocolate center — a nostalgic treat that melts into a shiny puddle when you remove the kiss tip.
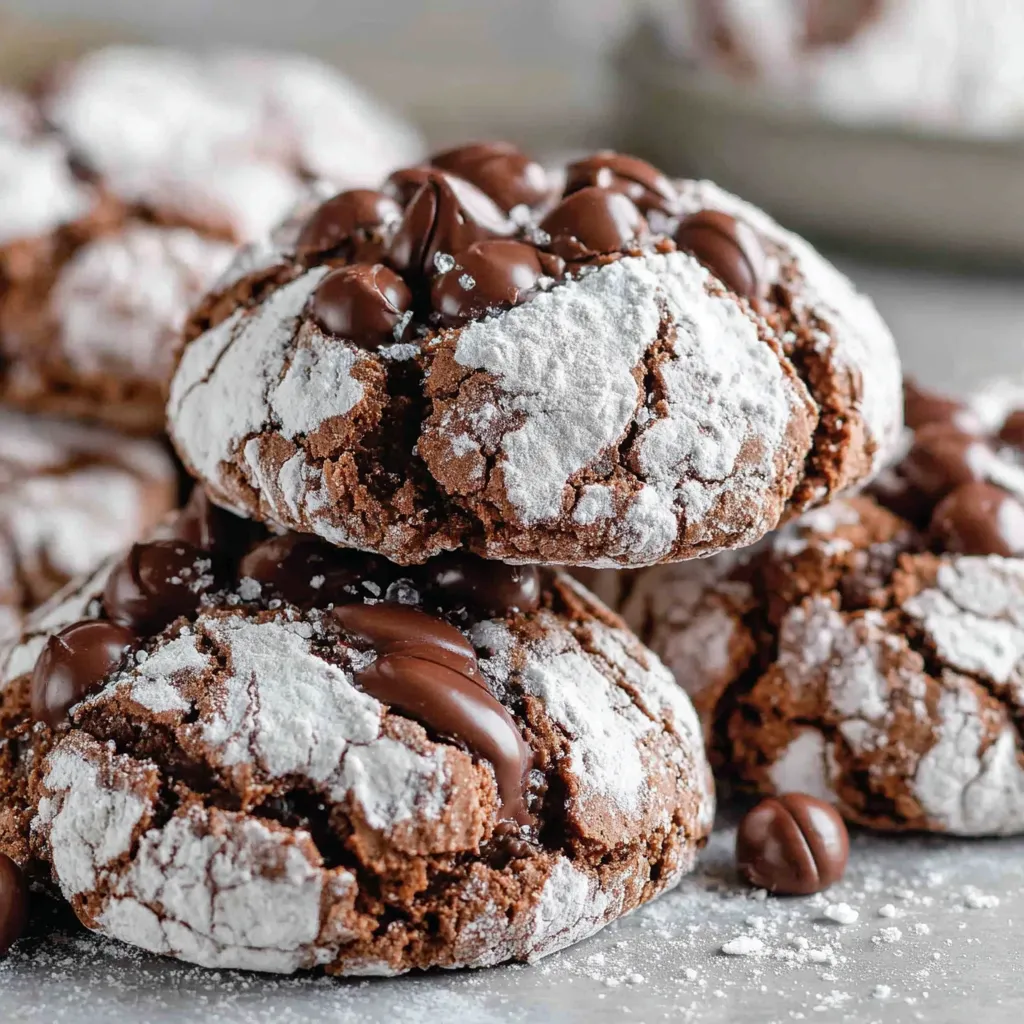
This Chocolate Puddles recipe has been one of my favorite treats to bring to holiday parties and impromptu coffee visits. I discovered the technique of removing the tip from a softened Hershey’s kiss by accident one snowy evening when I wanted a cookie that kept a melty center but wouldn't leave a hard peak on top. The result is a tender, cocoa-forward round of dough that crisps very lightly at the edges and yields to a glossy chocolate puddle in the middle. The texture is a balance of soft crumb and smooth melted chocolate that makes every bite feel indulgent yet familiar.
I first tested this version during a family cookie swap years ago; it took three batch trials to perfect the dough ratio so the cookies would hold shape, spread minimally, and accept the melted kiss without collapsing. Since then it's become my go-to roll-and-bake cookie when I want something quick, visually charming, and reliably delicious. The subtle suggestion of peppermint as an option gives holiday flair, while the classic vanilla keeps the chocolate singing year-round. Share these warm from the oven and watch people quietly fan their mouths in delight — that's the moment I keep baking for.
When I first served these at a cookie exchange, neighbors asked for the recipe on the spot. My aunt tucked one in her coat to take home, and my kids declared them the official cookie of movie nights. The tiny ritual of unwrapping each kiss and watching it bloom into a shiny puddle became the highlight of our baking afternoon.
My favorite part of these is the ritual: unwrapping a kiss and watching the chocolate bloom into a mirror-like center. At a winter potluck, a cousin told me she ate three in a row and then asked for the recipe — moments like that remind me why I bake: to create tiny joys that people remember.
Store cooled cookies in an airtight container at room temperature for up to 4 days to preserve the soft interior and shiny puddles. If humidity is high, place a sheet of parchment between layers and a small desiccant packet to reduce moisture. For longer storage, flash-freeze cookies on a tray until firm, then transfer to a freezer-safe bag and freeze for up to 3 months. To reheat frozen cookies, thaw at room temperature and warm in a 300°F oven for 4–6 minutes to refresh the sheen of the chocolate center without softening the cookie too much.

If you need a dairy-free version, replace butter with a plant-based stick butter at a 1:1 ratio and use dairy-free chocolate kisses; texture will be slightly different but still tasty. For a lower-sugar option, reduce granulated sugar to 1/3 cup and use a brown sugar substitute like Swerve for the brown component, though the chewiness and color will change. Gluten-free flour blends can substitute for all-purpose at a 1:1 ratio—prefer blends with xanthan gum for structure. Peppermint extract (1 teaspoon) swaps for vanilla for a holiday twist; start with less if your extract is strong.
Serve warm on a platter dusted with extra powdered sugar for contrast, or pair with a mug of hot chocolate or espresso to mirror the intense cocoa notes. For a seasonal platter, alternate with thumbprint cookies and shortbread for textural variety. Garnish each cookie with a tiny sprinkle of flaky sea salt after the kiss has been pressed and tip removed for an elevated sweet-salty counterpoint that highlights the chocolate.
The idea of pressing chocolate into a freshly baked cookie dates back to classic European and American baking traditions where centers were filled with ganache, jam, or chocolate; Hershey’s kisses became a popular American adaptation for convenience and charm. This cookie blends shortbread-like tenderness and American holiday aesthetics — compact, shareable, and built around a single, eye-catching finish that celebrates portable sweetness and nostalgia.
For winter holidays, substitute peppermint extract for vanilla and use red or green cupcake liners under each cookie for a festive presentation. In summer, add a teaspoon of espresso powder to deepen chocolate flavor or top with a small spoonful of salted caramel in the center instead of the kiss for a warm-season twist. Swap dark chocolate kisses in autumn and pair with chili flakes or orange zest for more complex seasonal flavors.
For batch baking, form dough balls, roll in powdered sugar, and place on a tray lined with parchment. Freeze the raw rolled balls on the tray until solid, then transfer to a sealed bag. Bake from frozen — add 1–2 minutes to the bake time and press kisses in immediately when they come out. This method lets you bake fresh cookies in small quantities without remaking dough each time.
These Chocolate Puddles are my little piece of nostalgia and a reliable crowd-pleaser. Whether you make them for a party or a quiet evening, they’re forgiving, adaptable, and always disappear faster than expected. Bake a batch and make the moment — the glossy centers and soft cookies are a simple way to create new memories around an old favorite.
Chill the dough for at least 1 hour to prevent excessive spread and create a defined mound for the puck of chocolate.
Roll dough balls in powdered sugar just before baking to keep the exterior attractive and slightly crisper.
Press the unwrapped kiss into the warm cookie immediately after removing from the oven, then wait 2 minutes before removing the tip to allow the chocolate to soften evenly.
Freeze unbaked rolled balls on a tray and store in a sealed bag to bake fresh cookies as needed.
This nourishing chocolate puddles recipe is sure to be a staple in your kitchen. Enjoy every moist, high protein slice — it is perfect for breakfast or as a wholesome snack any time.
This Chocolate Puddles recipe makes perfectly juicy, tender, and flavorful steak every time! Serve with potatoes and a side salad for an unforgettable dinner in under 30 minutes.
In a medium bowl combine the flour, cocoa, baking soda, baking powder, and cornstarch. Whisk until uniform and set aside to ensure even distribution before mixing into wet ingredients.
In a separate bowl cream softened butter with granulated and light brown sugar for about 2 minutes on medium speed until light and fluffy, then scrape the bowl to incorporate all ingredients evenly.
Beat in the room-temperature eggs and vanilla (or peppermint) until the mixture is smooth and homogeneous, taking care not to overbeat once eggs are incorporated.
With the mixer on low speed, gradually add the dry mixture to the wet and beat just until combined; the dough should be cohesive but not overworked.
Cover dough with plastic wrap and refrigerate for 1 hour so the fat firms and the dough is easier to portion and spreads less in the oven.
Preheat oven to 350°F. Use a 1 1/2 tablespoon scoop to portion dough, roll each ball in powdered sugar, and place 2 inches apart on parchment-lined sheets.
Bake for 8–9 minutes. Remove from oven and immediately press one unwrapped Hershey’s kiss into each cookie. After 2 minutes, lift and discard the tip from each kiss so the chocolate puddles into the cookie center.
Transfer cookies to a cooling rack and allow them to cool completely. Store in an airtight container at room temperature for up to 4 days or freeze for longer storage.
Last Step: Please leave a rating and comment letting us know how you liked this recipe! This helps our business to thrive and continue providing free, high-quality recipes for you.
Leave a comment & rating below or tag
@yumelle on social media!

Juicy chicken meatballs baked with Parmesan and herbs, spooned with marinara, and covered in melty mozzarella on toasted slider rolls. Irresistible for parties.

Twirl eerie-colored spaghetti and top it with gooey, cheese-stuffed monster meatballs complete with olive eyes for a delightfully spooky family dinner.

Silky egg ribbons swirl through savory chicken broth, scented with sesame and scallions. Simple pantry staples, ready in just 10 minutes.
Leave a comment & rating below or tag @yumelle on social media!
Enjoyed this recipe? Share it with friends and family, and don't forget to leave a review!
This recipe looks amazing! Can't wait to try it.
Comments are stored locally in your browser. Server comments are displayed alongside your local comments.

Join to receive our email series which contains a round-up of some of our quick and easy family favorite recipes.
