
Chocolate Peanut Butter Cookies

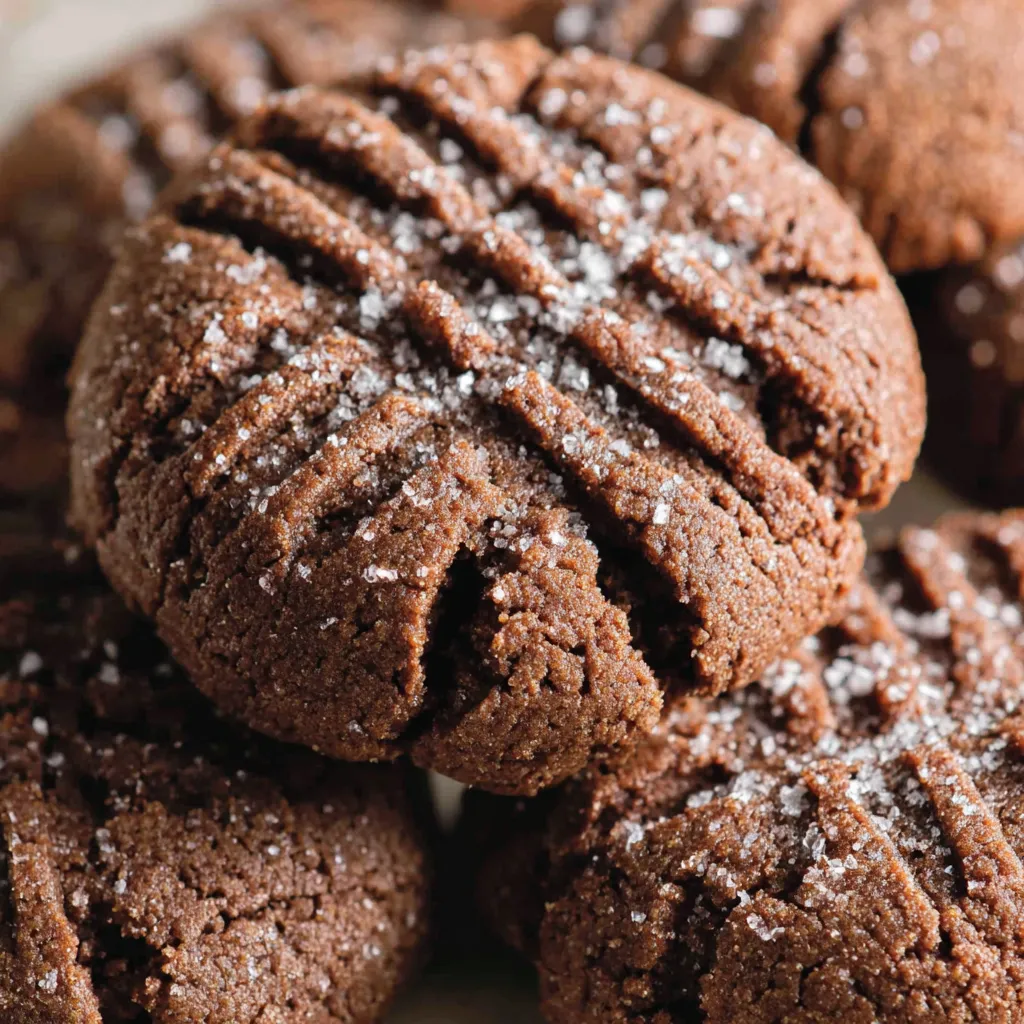
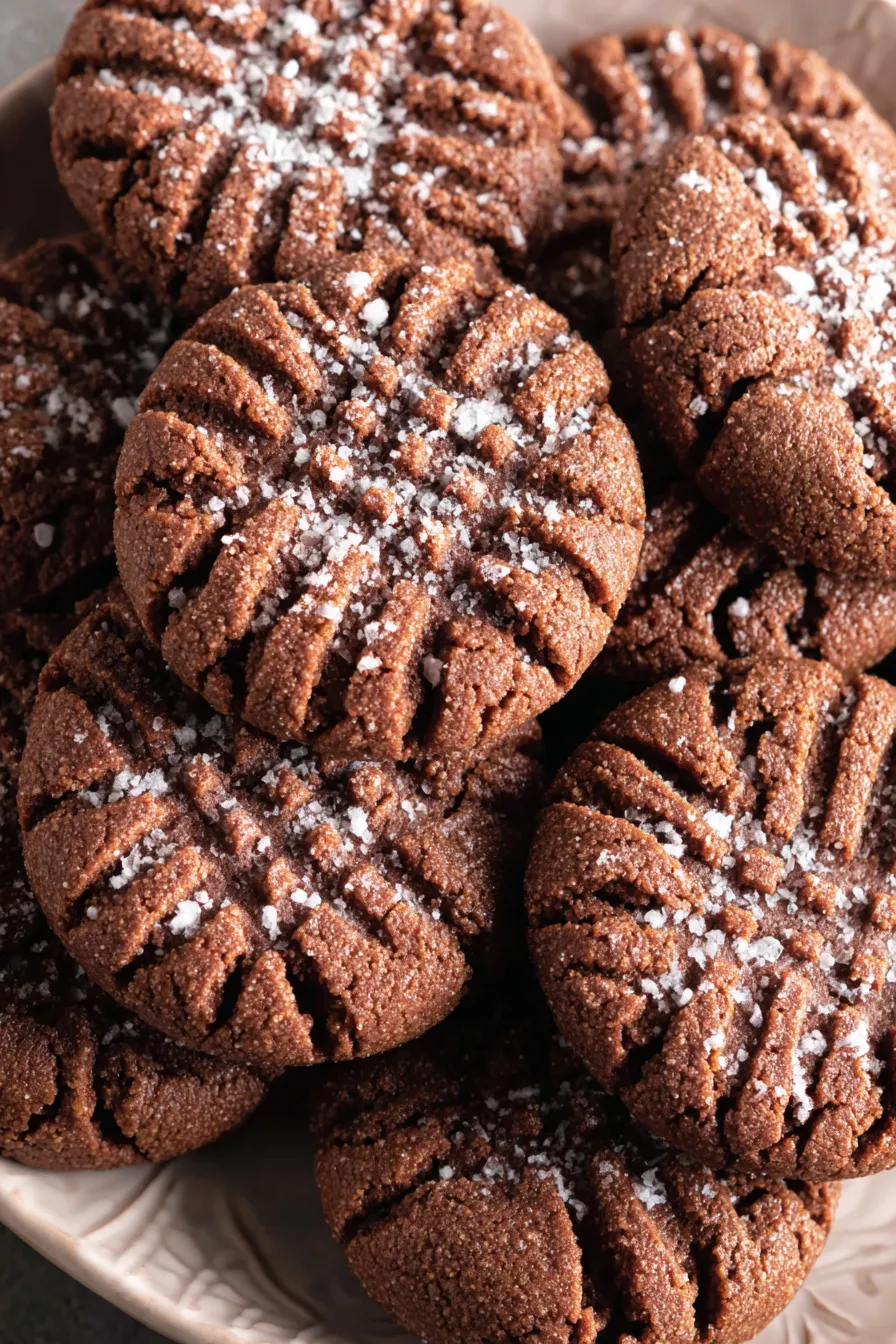
Decadent chocolate cookies studded with creamy peanut butter — crisp on the edges, tender inside, rolled in sugar for a sparkle and finished with the classic criss-cross.
This recipe for Chocolate Peanut Butter Cookies has been a celebration staple in my kitchen since I first combined cocoa with my go-to peanut butter base one rainy afternoon. I was chasing the perfect weekend cookie: something that felt indulgent, transported easily, and woke up the house with a warm, nutty aroma. The first batch disappeared before I could write down the tweaks. Since then this dough has carried me through potlucks, birthday parties, and quiet afternoons with a cup of coffee.
What makes these cookies special is the texture contrast: a faint crunch from the sugared exterior, a tender, fudgy middle, and that unmistakable peanut butter flavor threaded throughout. The cocoa is added generously so the cookies have true chocolate depth without overwhelming the peanut butter. I often think back to handing a warm cookie to a neighbor when I moved in — a small comfort that quickly became a shared favorite. These cookies are forgiving, make-ahead friendly, and perfect for bakers of any skill level.
Why You'll Love This Recipe
- Balanced flavor: rich cocoa and creamy peanut butter combine to create a deep chocolate note with a nutty warmth rather than a single dominant taste.
- Reliable texture: sugared exterior for sparkle and a soft, slightly fudgy center — you get a cookie that keeps its shape but stays tender.
- Quick to mix: the dough comes together in one bowl with a mixer; most of the time is chilling, which makes it perfect for evening prep and next-day baking.
- Uses pantry staples: flour, cocoa, sugar, butter, and peanut butter — no specialty ingredients needed, so it’s great for last-minute baking.
- Make-ahead friendly: dough can be refrigerated or portioned and frozen for weeks, making it ideal for planning treats ahead.
- Crowd-pleaser: the blend of chocolate and peanut butter appeals to both kids and adults and works for celebrations or everyday indulgence.
Our family quickly declared these the weekend cookie. I learned to chill the dough for an hour after the first few tries — that tiny pause is the secret to the crinkly tops and controlled spread. Guests often ask for the recipe and for tips on getting the classic fork criss-cross, which I happily demonstrate each time.
Ingredients
- All-purpose flour (2 1/4 cups): Use a reliable brand and spoon the flour into the measuring cup instead of packing it to avoid dense cookies. King Arthur or Gold Medal give consistent results and produce a tender crumb.
- Cocoa powder (2/3 cup, unsweetened): Do not pack — measure by spooning lightly. Use a good-quality Dutch-process or natural cocoa depending on your taste; I prefer natural for a brighter chocolate note.
- Baking powder & baking soda (1 teaspoon each): Provide lift and a balanced rise — check freshness for best texture.
- Sugar (1 1/2 cups total): 1 cup plus an extra 1/2 cup reserved for rolling. Use granulated sugar for the coating to give a subtle crunch and sparkle.
- Butter (1 cup, softened): Unsalted is best so you can control seasoning; room temperature butter creams more easily for a lighter dough.
- Creamy peanut butter (1 cup): Stir to recombine oil and choose a smooth variety; natural brands work but may slightly affect spread if very runny.
- Light brown sugar (1 1/4 cups, packed): Adds moisture and a caramel note — pack gently to measure accurately.
- Eggs (2): Large eggs bind and add tenderness; add one at a time and mix just until combined to avoid overworking the dough.
- Vanilla extract (1 teaspoon): Enhances both chocolate and peanut flavors — use pure vanilla for best aroma.
Instructions
Prep the baking surface: Line a cookie sheet with parchment paper or a silicone baking mat to prevent sticking and promote even browning. Preheat the oven to 350°F just before you plan to bake so it reaches temperature after chilling. Mix dry ingredients: Sift the flour, cocoa powder, baking powder, and baking soda into a bowl to remove lumps and aerate. Sifting prevents cocoa pockets and helps the dry mix incorporate uniformly into the butter-peanut butter base. Reserve coating sugar: Measure out 1/2 cup of the sugar and set it aside in a shallow dish for rolling. Using a quart-size zip-top bag to roll dough balls in sugar keeps hands clean and ensures an even coating. Cream fats and sugars: In a stand mixer or using a hand mixer, cream the softened butter and peanut butter until homogenous, about 1–2 minutes. Add light brown sugar and the remaining granulated sugar and beat until fluffy, about 2–3 minutes. Proper creaming traps air for lift and helps dissolve sugar for a tender bite. Add eggs and vanilla: Incorporate eggs one at a time, mixing just until each is combined, then add the vanilla. Avoid overmixing after the eggs go in to keep the dough from becoming tough. Combine dry and wet: Slowly add the sifted flour and cocoa mixture on low speed or fold by hand until just incorporated. Scrape the bowl to catch any streaks — the dough should be uniform and slightly sticky. Chill: Cover the dough and refrigerate for 1 hour. Chilling firms the fats, controls spread, and deepens flavor — don’t skip this step unless you want flatter cookies. Portion and roll: Scoop dough with a small cookie scoop or tablespoon and form 1 to 1 1/2-inch balls. Roll each ball in the reserved sugar until fully coated. Place dough balls about 2 inches apart on the prepared sheet to allow for even spreading. Criss-cross and bake: Dip a fork lightly in sugar to prevent sticking and press a gentle criss-cross on each ball. Bake at 350°F for 8–10 minutes — look for set edges and slightly soft centers. Allow the cookies to rest on the baking sheet for 2–3 minutes to set before transferring to a wire rack to cool completely.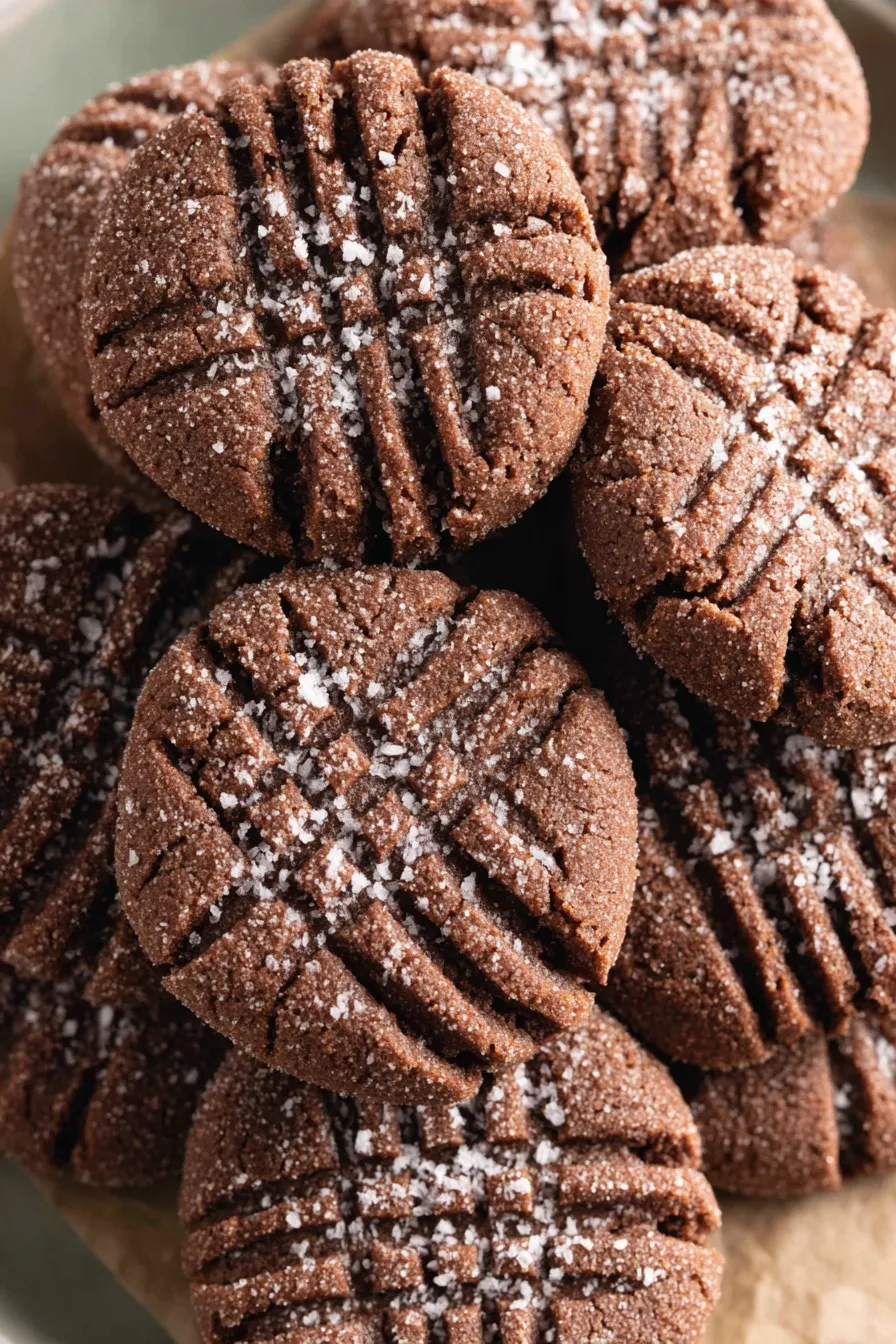
You Must Know
- These cookies freeze well: portion the dough into balls and freeze on a sheet; transfer to a bag for up to 3 months.
- Storage: store cooled cookies in an airtight container at room temperature for up to 5 days; add a slice of bread to maintain softness.
- Allergens: contains peanuts, eggs, dairy, and gluten — adjust accordingly for dietary needs.
- Nutritional note: each cookie carries energy from both fats and sugars — portion mindfully if serving to children or those monitoring intake.
What I love most about this method is how forgiving it is: chill time prevents over-spread, and the sugar roll gives a bakery-like finish. Friends often remark they look store-bought, but they taste like homemade memory: warm, slightly melty, and impossibly comforting. I treasure delivering a batch hot from the oven; the feedback is immediate — smiles and requests for the next batch.
Storage Tips
Store cooled cookies in an airtight container at room temperature for up to five days. To retain softness, place a slice of white bread in the container — the cookies will absorb moisture and stay tender. For longer storage, freeze baked cookies in a single layer on a sheet until firm, then transfer to a freezer-safe bag for up to three months. Reheat frozen cookies at 325°F for 5–7 minutes or microwave a single cookie for 10–15 seconds to regain that freshly-baked warmth. Dough balls freeze equally well; bake from frozen with an extra 1–2 minutes of oven time.
Ingredient Substitutions
If you need alternatives, swap creamy peanut butter for almond or cashew butter for a different nutty profile (texture and spread may vary). For a slightly chewier cookie, replace 1/4 cup flour with oat flour. To make them dairy-free, use a vegan butter substitute and check the chocolate/cocoa processing; the cookies won't be vegan because they contain eggs unless you replace eggs with 2 tablespoons of applesauce per egg or a commercial egg replacer. Reducing sugar will affect texture and browning; if lowering sugar, consider adding 1–2 tablespoons of honey or maple to maintain chewiness.
Serving Suggestions
Serve warm with a glass of cold milk or alongside a robust coffee to balance sweetness. For a celebration, arrange on a platter with powdered sugar dusted around the edges and a few whole peanuts for garnish. These cookies pair well with vanilla ice cream as a sandwich filling or crumbled over a sundae. For holiday trays, mix with salted caramel squares or chocolate-dipped pretzels for contrasting textures and flavors. They also travel well and make thoughtful homemade gifts when wrapped in parchment and twine.
Cultural Background
Combining chocolate and peanut butter is an American flavor marriage that gained popularity in the 20th century with the rise of commercial peanut butter. The criss-cross fork mark is rooted in classic peanut butter cookie tradition and adds a distinctive look while slightly flattening the dough for even baking. This version blends that heritage with a dusting of sugar and extra cocoa to emphasize chocolate without sacrificing peanut character — a nod to both nostalgic cookies and modern, more intensely flavored variations.
Seasonal Adaptations
For winter holidays, stir in 1/2 cup mini chocolate chips and a pinch of cinnamon to add warmth. In summer, bake smaller 1-inch cookies to yield more shareable bites for picnics. For fall, add 1/2 cup chopped toasted pecans and a teaspoon of pumpkin pie spice for seasonal depth. You can top cooled cookies with a drizzle of melted chocolate or salted caramel for festive occasions — allow decorations to set before stacking.
Meal Prep Tips
Make dough ahead: prepare and portion dough into 1- to 1 1/2-inch balls, flash-freeze on a tray, then store in a labeled zip-top bag. When ready to bake, place frozen balls on a sheet and add 1–2 minutes to the baking time. For weekly treats, bake a double batch and freeze baked cookies in stacks separated by parchment for easy thawing. Use airtight, shallow containers for refrigerated storage to avoid crushing, and label with baking and freeze dates to keep track.
These Chocolate Peanut Butter Cookies are a dependable, joyful addition to any baking lineup — easy to prepare, easy to love, and full of personality. Share them, freeze them, and make them your own; once you try the sugar roll and fork criss-cross, you’ll wonder how you ever made cookies any other way.
Pro Tips
Chill the dough for at least one hour to prevent excessive spreading and to concentrate flavors.
Dip your fork in sugar before pressing the criss-cross to keep it from sticking to the dough.
Reserve 1/2 cup of granulated sugar for rolling the dough balls to create a delicate sparkle and slight crunch.
This nourishing chocolate peanut butter cookies recipe is sure to be a staple in your kitchen. Enjoy every moist, high protein slice — it is perfect for breakfast or as a wholesome snack any time.
FAQs about Recipes
Can I freeze the dough?
Yes. Dough balls can be frozen on a tray until firm, then transferred to a freezer bag for up to 3 months. Bake from frozen, adding 1–2 minutes to the bake time.
How do I get the criss-cross pattern without the fork sticking?
Use a fork dipped in sugar for the classic criss-cross. Press lightly to create the pattern without flattening the center too much.
Tags
Chocolate Peanut Butter Cookies
This Chocolate Peanut Butter Cookies recipe makes perfectly juicy, tender, and flavorful steak every time! Serve with potatoes and a side salad for an unforgettable dinner in under 30 minutes.
Ingredients
Main
Instructions
Prepare baking sheet and preheat
Line a cookie sheet with parchment paper or a silicone baking mat. Preheat oven to 350°F just before the dough finishes chilling so oven reaches temperature when ready to bake.
Sift dry ingredients
Sift together flour, cocoa powder, baking powder, and baking soda into a bowl to remove lumps and aerate the mixture for an even bake.
Reserve sugar for rolling
Measure out 1/2 cup granulated sugar and set aside for rolling the dough balls to create a sugared exterior that adds texture and a bakery finish.
Cream butter and peanut butter
Cream the softened butter and peanut butter until smooth, about 1–2 minutes, then add brown sugar and remaining granulated sugar and beat until light and fluffy.
Add eggs and vanilla
Add eggs one at a time, mixing just until each is incorporated, then add vanilla. Avoid overmixing to keep the dough tender.
Combine wet and dry
Gradually add the sifted dry mixture and mix on low or fold by hand until just combined; do not overmix to maintain a tender crumb.
Chill the dough
Cover the dough and refrigerate for 1 hour to firm it up and concentrate flavors; chilled dough also helps control spread during baking.
Portion, roll, and press
Scoop 1 to 1 1/2-inch balls, roll in reserved sugar, place 2 inches apart on the sheet, and press a criss-cross with a sugar-dipped fork just before baking.
Bake and cool
Bake at 350°F for 8–10 minutes until edges are set and centers remain slightly soft. Let rest on the baking sheet 2–3 minutes, then transfer to a rack to cool.
Last Step: Please leave a rating and comment letting us know how you liked this recipe! This helps our business to thrive and continue providing free, high-quality recipes for you.
Nutrition
Did You Make This?
Leave a comment & rating below or tag
@yumelle on social media!
Categories:
You might also like...

Chicken Parmesan Meatball Sliders
Juicy chicken meatballs baked with Parmesan and herbs, spooned with marinara, and covered in melty mozzarella on toasted slider rolls. Irresistible for parties.

Spooky Spaghetti Monster Meatballs
Twirl eerie-colored spaghetti and top it with gooey, cheese-stuffed monster meatballs complete with olive eyes for a delightfully spooky family dinner.

10-Minute Egg Drop Soup
Silky egg ribbons swirl through savory chicken broth, scented with sesame and scallions. Simple pantry staples, ready in just 10 minutes.
Did You Make This?
Leave a comment & rating below or tag @yumelle on social media!
Rate This Recipe
Share This Recipe
Enjoyed this recipe? Share it with friends and family, and don't forget to leave a review!
Comments (1)
This recipe looks amazing! Can't wait to try it.
Comments are stored locally in your browser. Server comments are displayed alongside your local comments.

Hi, I'm Hannah!
What's Popular

30-Minute Meals!
Join to receive our email series which contains a round-up of some of our quick and easy family favorite recipes.