
>>

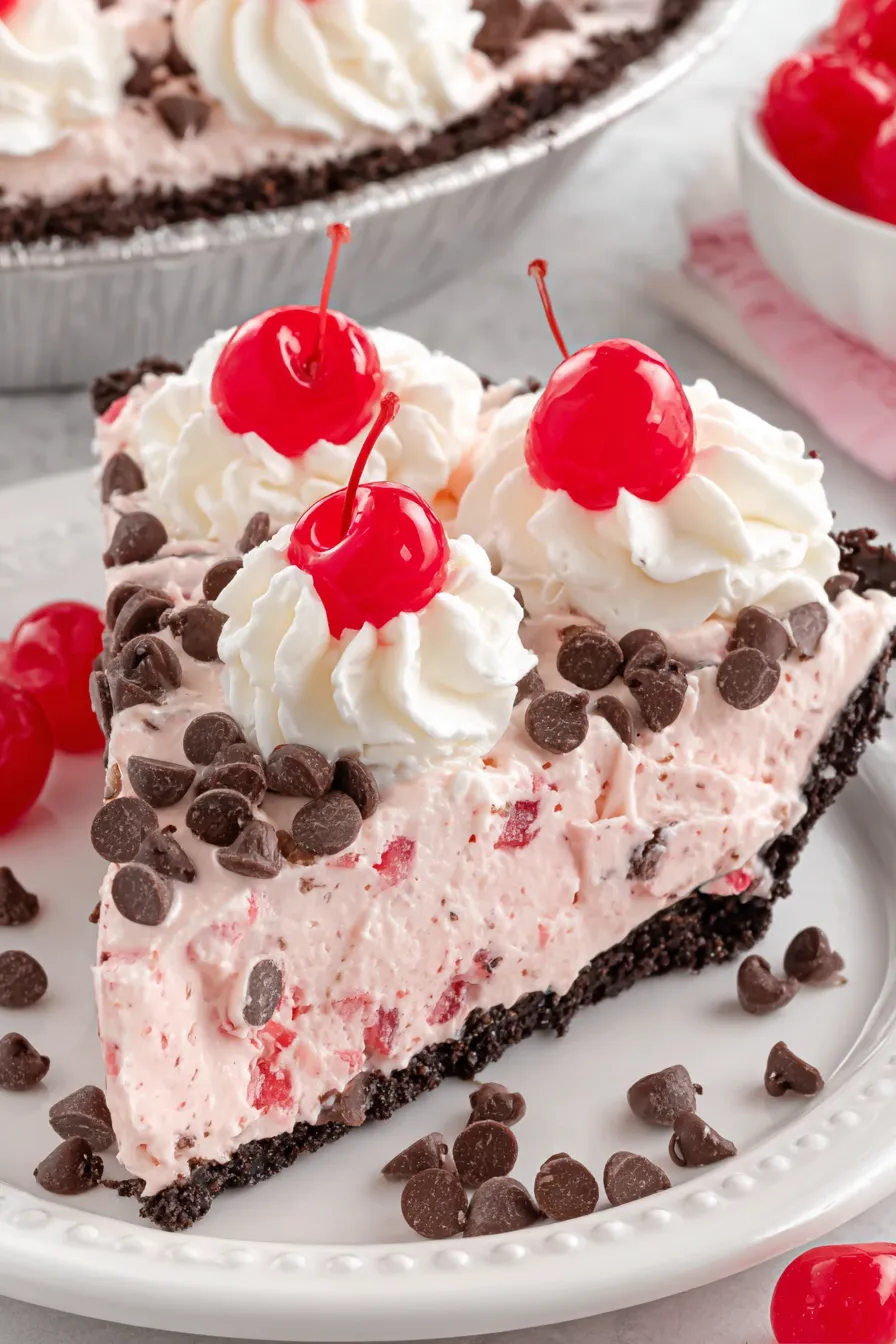
A luscious, no-bake chocolate cherry pie with a creamy cherry-cream cheese filling, studded with mini chips and finished with whipped cream and cherries.

This Chocolate Cherry Pie is a celebration-ready, no-bake treat that quickly became a favorite in my kitchen. I first created this combination on a hot summer afternoon when I wanted something decadent but fuss-free for a family get-together. The chocolate crust provides a crisp, slightly bitter counterpoint to a luxuriously creamy filling where bright cherry preserves mingle with smooth cream cheese and clouds of whipped topping. The first time I set this pie on the table my kids reached for it before dinner was even cleared and my sister insisted I write down the method so she could make it for her book club. It is one of those dishes that looks elegant but is forgiving in technique.
What makes this pie special is its balance of texture and flavor. The chocolate crust gives structure and a chocolatey bite. The cream cheese and whipped topping create a silky, mousse-like filling while the cherry pie filling adds sweet-tart pockets of fruit. Mini semi-sweet chocolate chips are folded through to add little pockets of melted chocolate beneath the garnish. Between the ease of assembly and the impressive result, this is a dessert I reach for when I want something quick, pretty, and reliably crowd-pleasing.
I remember bringing this to a summer potluck and having guests ask for the recipe twice. It travels well and stays stable at room temperature for a short while, so it is ideal for outdoor gatherings. It has become my go-to when I want a dessert that feels special without a lot of hands-on time.

My favorite aspect of this pie is how versatile it is. I have made it for birthday parties, summer potlucks, and holiday dinners. It holds its shape beautifully and always elicits compliments, especially when the cherries peek from the glossy filling. The recipe is forgiving, so if you slightly over-whip or under-sweeten you can usually rebalance by folding in a touch more topping or sugar.
Store the pie in the refrigerator covered loosely with plastic wrap or in an airtight container. For best texture, consume within 3 days; after that the crust can begin to soften from moisture migration. If you need to freeze, wrap the whole pie tightly in plastic and then foil to prevent freezer burn. Thaw overnight in the fridge and re-fluff any topping before serving. Avoid leaving it at room temperature for more than two hours, especially in warm weather, because the filling contains dairy and whipped topping.
If you need dairy-free options, use a dairy-free cream cheese alternative and a plant-based whipped topping; also choose a gluten-free chocolate crust. For a less sweet dessert, swap half the powdered sugar for a neutral sweetener like erythritol powdered blend, but reduce only a little to maintain the set. For a boozy twist, fold in a tablespoon of cherry liqueur or brandy with the cherry filling. Using fresh cherries cooked down with a little sugar and cornstarch can replace the canned filling for a fresher fruit flavor.
Serve chilled slices on dessert plates with an extra dollop of whipped topping and a fresh cherry or two. Pair with a small scoop of vanilla ice cream or a cup of strong espresso to balance sweetness. For festive presentations, pipe rosettes around the edge and sprinkle with shaved chocolate or cocoa powder. This pie works well at summer barbecues and holiday dinners alike; offer smaller slices for coffee hours or larger portions for celebratory desserts.
While not a traditional historic dish, this mash-up bridges classic American pie traditions and modern no-bake dessert trends. Chocolate cookie crusts became popular with the rise of convenience baking, while cherry pie filling is a long-time American pantry staple. Combining whipped, cream-cheese-based fillings with fruit and chocolate is a contemporary take that pulls from mousse and pie conventions to create a hybrid that feels both nostalgic and modern.
In summer, swap the canned cherries for a quick compote of fresh cherries and a touch of lemon for brightness. For winter holidays, stir in a pinch of cinnamon or use spiced cherries. Around Valentine’s Day, add a drizzle of warm dark chocolate over each slice and garnish with toasted almond slivers. Small changes in garnish and spices make this pie fit any season while keeping the basic method unchanged.
Make the filling a day ahead and store it in the refrigerator. On the day of serving, spoon it into the crust, chill until set, and decorate just before guests arrive. Keep extra whipped topping chilled in a piping bag so you can quickly pipe fresh swirls at serving time. If transporting, chill the pie on a flat tray and keep it cool with ice packs in a cooler bag to avoid softening during transit.
Every time I make this pie it yields smiles and requests for the recipe. The combination of chocolate and cherries is timeless, and this easy assembly method lets you offer a party-ready dessert without spending hours in the kitchen. Try it once and you will probably find, as I did, that it becomes a reliable favorite for all kinds of celebrations.
Soften cream cheese to room temperature for at least 30 minutes to avoid lumps when mixing.
Reserve some mini chips for the top to maintain visual contrast and texture.
Chill the assembled pie for at least 3 hours or overnight for the cleanest slices.
Use mini chocolate chips rather than regular to ensure even distribution and small chocolate pockets.
This nourishing chocolate cherry pie recipe is sure to be a staple in your kitchen. Enjoy every moist, high protein slice — it is perfect for breakfast or as a wholesome snack any time.
This Chocolate Cherry Pie recipe makes perfectly juicy, tender, and flavorful steak every time! Serve with potatoes and a side salad for an unforgettable dinner in under 30 minutes.
Beat 8 ounces of softened cream cheese with 1 cup of powdered sugar until smooth and light in texture, about 2 to 3 minutes on medium speed. Scrape the bowl to ensure even mixing and remove any lumps.
Using a spatula, stir in the full 21-ounce can of cherry pie filling until cherries are evenly distributed but still intact. Avoid overmixing to keep visible fruit pockets.
Gently fold 8 ounces of thawed Cool Whip into the cherry-cream cheese mixture using wide strokes to keep the mix airy. The goal is a mousse-like consistency.
Fold in 1 cup of mini semi-sweet chocolate chips until evenly dispersed. Reserve remaining chips for garnish to preserve a textured top.
Spread the filling into the 9-inch chocolate crust, smooth the surface, cover loosely, and refrigerate for 3 to 4 hours or overnight until firm.
Top with dollops or piped swirls of additional Cool Whip, sprinkle reserved mini chips, and garnish with maraschino cherries just before serving.
Last Step: Please leave a rating and comment letting us know how you liked this recipe! This helps our business to thrive and continue providing free, high-quality recipes for you.
Leave a comment & rating below or tag
@yumelle on social media!

Juicy chicken meatballs baked with Parmesan and herbs, spooned with marinara, and covered in melty mozzarella on toasted slider rolls. Irresistible for parties.

Twirl eerie-colored spaghetti and top it with gooey, cheese-stuffed monster meatballs complete with olive eyes for a delightfully spooky family dinner.

Silky egg ribbons swirl through savory chicken broth, scented with sesame and scallions. Simple pantry staples, ready in just 10 minutes.
Leave a comment & rating below or tag @yumelle on social media!
Enjoyed this recipe? Share it with friends and family, and don't forget to leave a review!
This recipe looks amazing! Can't wait to try it.
Comments are stored locally in your browser. Server comments are displayed alongside your local comments.

Join to receive our email series which contains a round-up of some of our quick and easy family favorite recipes.
