
Amish Chicken

A comforting, old-fashioned Amish-style baked chicken in a rich cream gravy—crispy skin, tender meat, and a simple pantry-friendly sauce.
This Amish chicken recipe has been a weeknight hero in my kitchen for years. I first tasted a version of this dish at a neighbor’s potluck on a cold autumn evening, when plates were passed around and every plate came back empty. The combination of a gently seasoned flour crust and a surprisingly luscious cream-based sauce felt indulgent yet wholly approachable. It creates a crisp golden skin on bone-in, skin-on thighs while keeping the meat exceptionally juicy beneath, and the baking method keeps cleanup simple. I find that the aroma of smoked paprika and garlic filling the house makes everyone gather before the timer even dings.
I often make this when I want something satisfying without fuss. The recipe is forgiving: you can scale it for a family meal or a larger gathering, and it adapts easily to whatever is in the pantry. The contrast between the crunchy seasoned coating and the silky gravy spooned over mashed potatoes or buttered noodles is what keeps my family asking for seconds. There’s a nostalgic quality to it too, a reminder of slow, quiet dinners and the comfort of simple, well-seasoned food shared with people you love.
Why You'll Love This Recipe
- Ready with mostly pantry staples and straightforward technique, this dish is perfect for busy evenings and beginner cooks alike.
- Takes about 15 minutes of hands-on preparation and bakes into a meal with minimal monitoring, freeing you to prepare sides or relax.
- Bone-in, skin-on thighs stay moist during the long, gentle bake while the seasoned flour gives a crisp, flavorful exterior.
- The cream-and-water mixture forms a quick pan gravy from the drippings, so there’s no extra roux or separate sauce to make.
- Makes a comforting, crowd-pleasing main that pairs beautifully with mashed potatoes, egg noodles, or roasted vegetables.
- Simple to scale up or down, and adaptable for make-ahead plans: assemble early and bake when ready.
My family’s reaction the first time I served this was immediate delight. My mother commented that it felt like something she remembered from childhood potlucks, and my partner declared it worthy of company dinners. Over time I learned small adjustments—brushing the skin with a touch of oil for extra crispness, and testing the temperature in the thickest part of the thigh—to guarantee consistent results.
Ingredients
- All-purpose flour, 1 cup: Spoon into the measuring cup and level it off for accuracy. The flour forms the seasoned crust; pick an unbleached flour for a cleaner flavor. King Arthur and Bob's Red Mill are reliable choices.
- Kosher salt, 1 tablespoon: Kosher salt gives better control when seasoning. If using table salt, use about half the amount and taste the pan juices for finishing.
- Smoked paprika, 2 teaspoons: Adds warmth and a subtle smoke note that complements the roasted thighs. Use Spanish smoked paprika for a deeper flavor or a mild smoked paprika for gentler smokiness.
- Garlic powder, 1 1/2 teaspoons: Provides an even garlic flavor without the risk of burning fresh garlic during baking. Use granulated garlic if that’s what you have.
- Onion powder, 1 1/2 teaspoons: Rounds out the savory profile and deepens the pan gravy’s flavor.
- Fresh cracked black pepper, 1 teaspoon: A coarse grind brings a lively finish on the skin; grind just before measuring for best aroma.
- Bone-in, skin-on chicken thighs, 8 pieces: Thighs are forgiving and stay moist; choose pieces of similar size for even baking. Look for pasture-raised or organic where possible for flavor and quality.
- Cold heavy cream, 1 1/4 cups: The cream enriches the baking liquid and transforms into a silky gravy mixed with the pan drippings. Use heavy cream or heavy whipping cream for best body.
- Cold water, 1 1/4 cups: Thins the cream to create the right consistency for baking and for finishing into gravy.
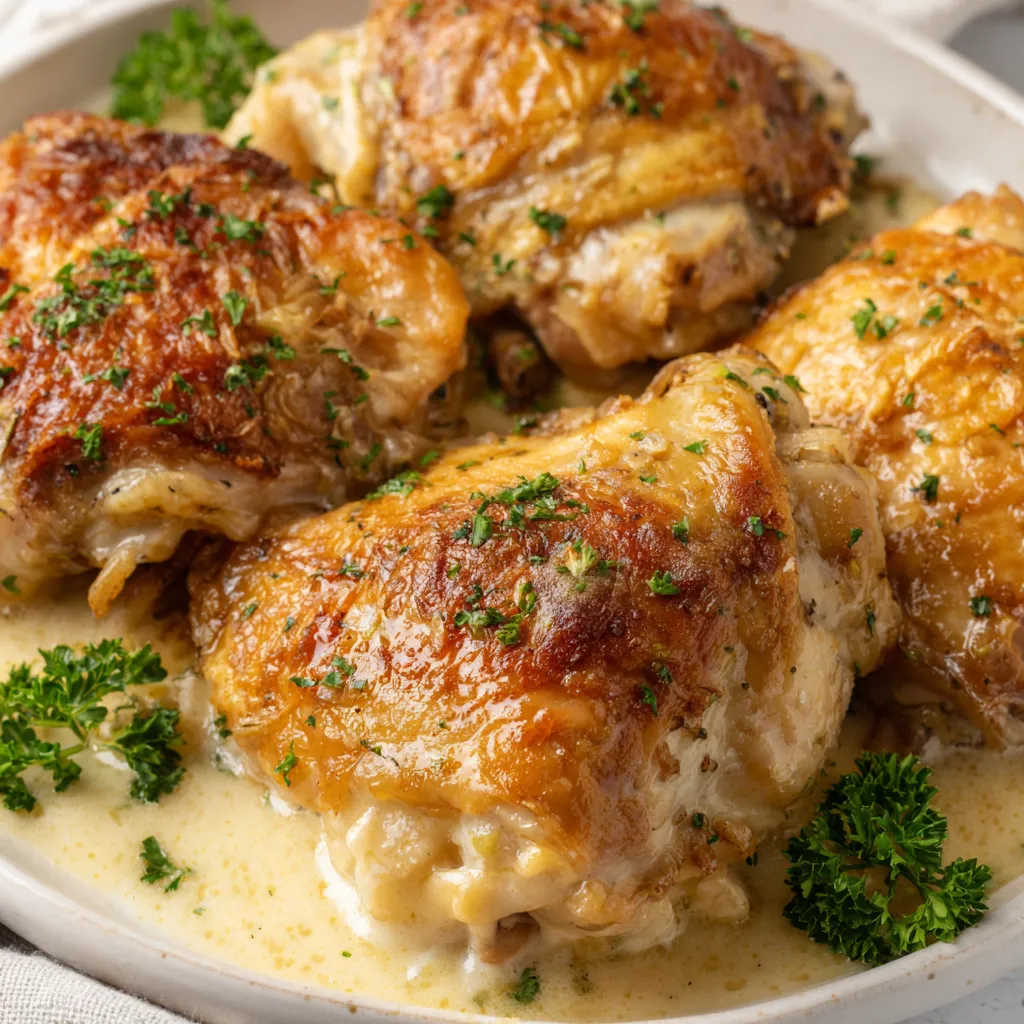
- Fresh parsley, 2 teaspoons chopped (garnish): A bright sprinkle of parsley adds color and a fresh herbal lift to the finished plate.
Instructions
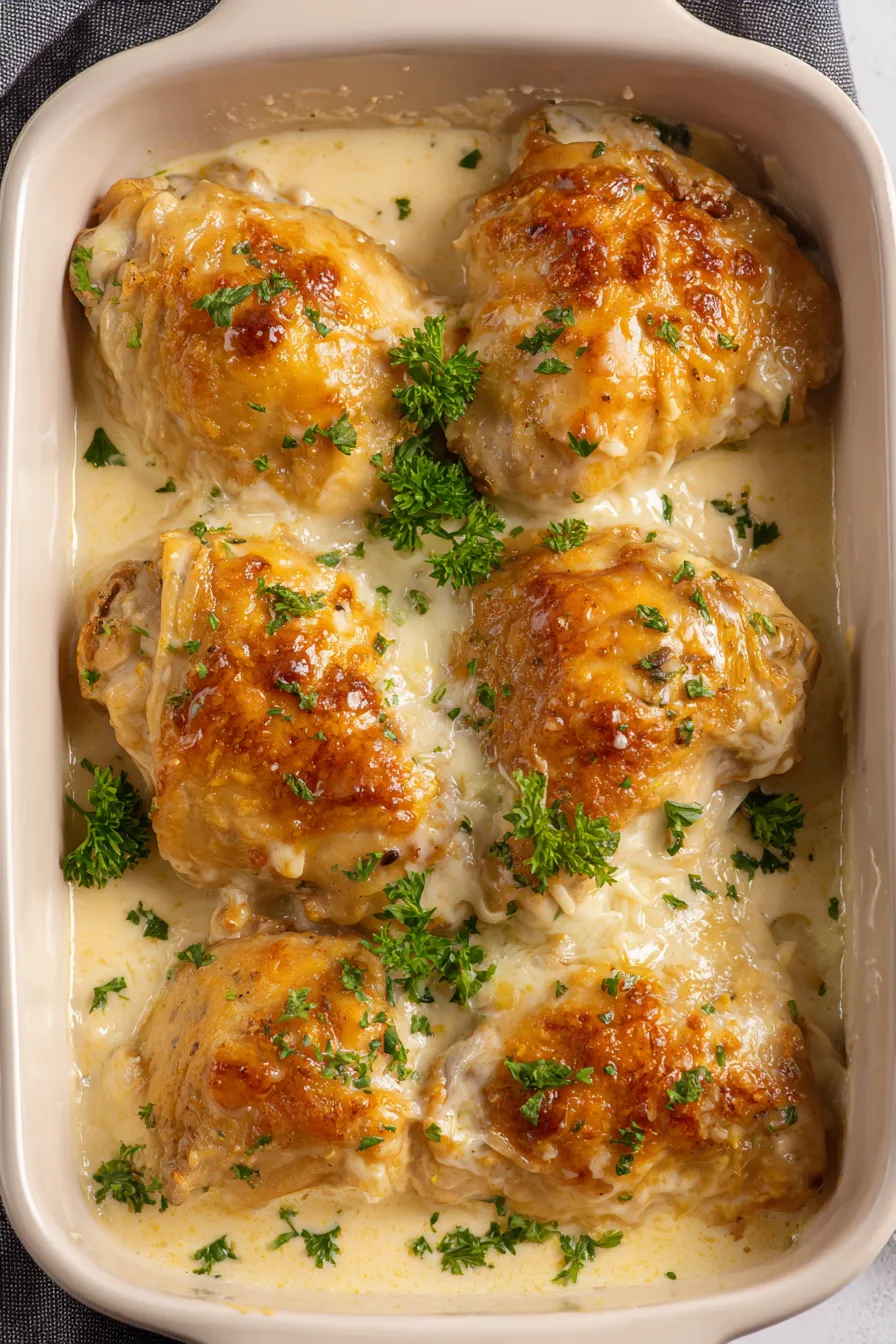
Preheat and prep the pan: Preheat the oven to 350°F and lightly spray a 9 by 13-inch baking dish with nonstick spray. A gentle oven temperature allows the thighs to cook through without drying and gives the skin time to render slowly. Position the rack in the center of the oven for even heat circulation. Combine dry seasoning: In a medium shallow bowl, whisk together 1 cup of all-purpose flour, 1 tablespoon kosher salt, 2 teaspoons smoked paprika, 1 1/2 teaspoons garlic powder, 1 1/2 teaspoons onion powder, and 1 teaspoon freshly cracked black pepper. Whisk until the mixture is uniform and free of lumps so each thigh receives even seasoning. Dredge and arrange the thighs: Pat each thigh dry with paper towels to ensure the flour adheres, then dredge the skin side up through the seasoned flour, shaking off any excess. Place each thigh skin side up in the prepared baking dish so the skin remains exposed and crisps during baking. Leave a little space between pieces for air circulation. Mix the cream liquid: Whisk together 1 1/4 cups cold heavy cream and 1 1/4 cups cold water until combined. Use cold liquid to slow the initial temperature change, which helps prevent the cream from separating as it heats. Pour and bake: Slowly pour the cream-and-water mixture around the thighs, keeping the skin mostly dry to encourage browning. Bake uncovered for 1 1/2 hours, or until juices run clear and the skin is golden brown. Use a digital meat thermometer inserted into the thickest part of the thigh without touching bone; it should read 165°F. If the skin isn’t as brown as you’d like after the time is up, place the dish under the broiler for 2 to 3 minutes while watching closely. Rest and make the gravy: Allow the thighs to rest in the baking dish for 5 minutes to let juices redistribute. Carefully tilt the pan and whisk the drippings into the cream mixture to create a silky gravy. Taste and adjust seasoning if needed before spooning over the chicken. Plate and garnish: Transfer thighs to a serving platter, spoon warm gravy over the top, and finish with 2 teaspoons chopped fresh parsley. Serve immediately with mashed potatoes, egg noodles, or roasted vegetables for a full, homey meal.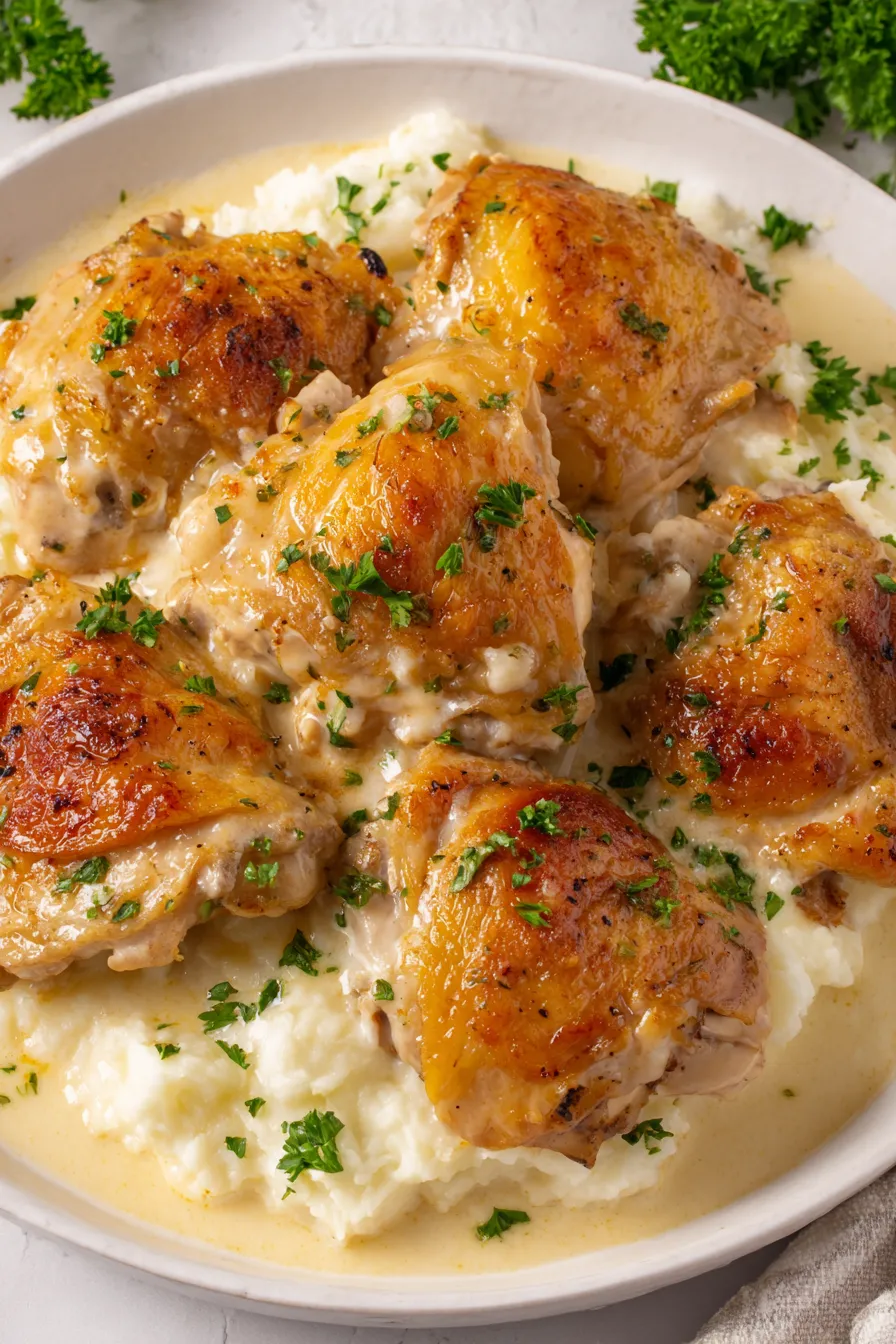
You Must Know
- This dish freezes well for up to three months when cooled, transferred to an airtight container, and labeled with the date; thaw overnight in the refrigerator before reheating.
- It’s high in protein and fat because of the thighs and heavy cream, so pair with light sides or bright salads to balance the meal.
- Keep an eye on the internal temperature rather than time alone: a thermometer is the most reliable indicator of doneness for dark meat.
- If you prefer a thicker gravy, reduce the pan juices on the stovetop for 3 to 5 minutes, or whisk in a tablespoon of cornstarch slurry off heat until it reaches the desired consistency.
- Leftovers maintain good texture when reheated gently in a 325°F oven to avoid drying the thighs.
One of my favorite parts of this recipe is how the creamy pan juices absorb the seasoned flour flavors to become an effortless sauce. At a family dinner last winter, my cousin used the gravy as dip for crusty bread and declared it the best thing on the table. Moments like that remind me that simple, well-executed food creates the most memorable meals.
Storage Tips
To store leftovers, cool the chicken to room temperature no longer than two hours after baking, then transfer to airtight containers. Refrigerate for up to four days. If you plan to freeze, portion the thighs so you can reheat only what you need. Freeze in a freezer-safe container with a thin layer of gravy to help protect the meat from freezer burn for up to three months. Reheat gently in a 325°F oven covered with foil for 15 to 25 minutes, depending on portion size, or microwave in short bursts, turning pieces for even heating. The gravy reheats well on the stovetop over low heat.
Ingredient Substitutions
If you need to avoid dairy, replace the heavy cream with full-fat coconut milk for a dairy-free gravy; note the subtle coconut flavor that will change the final profile. For a gluten-free version, use a 1:1 gluten-free flour blend in place of all-purpose flour and double-check that the blend contains xanthan gum for structure. To lighten the dish, swap half the cream with low-sodium chicken broth; the sauce will be less creamy but still flavorful. If smoked paprika is unavailable, use sweet paprika plus a pinch of chipotle for warmth.
Serving Suggestions
This chicken is perfect served over creamy mashed potatoes or buttered egg noodles to soak up the gravy. For lighter pairings, try roasted green beans, steamed asparagus, or a crisp cabbage slaw dressed with lemon and olive oil. Finish plates with a scattering of chopped parsley and perhaps a wedge of lemon for a brightness that cuts through the richness. For a holiday setting, provide buttery dinner rolls and a green salad to round out the table.
Cultural Background
The recipe reflects Midwestern comfort-cooking traditions often associated with Amish and Mennonite home kitchens: simple, ingredient-focused, and meant to feed a family with minimal fuss. Cream-based baked dishes are common in these communities, where dairy and home-raised poultry are staples. The technique of baking meat in a creamy liquid creates tender results and an easy pan sauce, reflecting the resourceful, get-it-done approach of rural American cooking traditions.
Seasonal Adaptations
In cooler months, lean into richer sides like mashed root vegetables and roasted Brussels sprouts. For spring and summer, lighten the plate with a fresh cucumber salad, blanched asparagus, or lemony green beans. Swap smoked paprika for a touch of fresh thyme and lemon zest when serving in summer to brighten flavors. For holiday variations, add a teaspoon of dried sage to the flour mix and serve with herbed stuffing and cranberry relish.
Meal Prep Tips
Assemble the seasoned flour mixture and dredge the thighs the night before, then tightly wrap the baking dish and refrigerate. When ready to cook, whisk the cold cream and water, pour it in, and bake. This saves time on busy days. Alternatively, bake everything and freeze individual portions for weekday meals; reheat in a low oven with a splash of broth to refresh the sauce. Use shallow, oven-safe meal prep containers for easy storage and reheating.
Bringing this dish to the table is always a quiet pleasure—simple, homey, and reliably delicious. I hope it becomes one of your go-to meals for cozy nights and hungry friends.
Pro Tips
Pat the chicken completely dry before dredging to ensure the flour adheres and the skin crisps.
Use a digital meat thermometer to verify the thighs reach 165°F in the thickest part for safe and juicy results.
If the skin isn’t browning to your liking, broil for 2 to 3 minutes at the end while watching closely.
Make the dish ahead by dredging the chicken the night before and refrigerating until ready to bake.
To thicken the gravy, reduce it on the stovetop or whisk in a small cornstarch slurry off heat.
This nourishing amish chicken recipe is sure to be a staple in your kitchen. Enjoy every moist, high protein slice — it is perfect for breakfast or as a wholesome snack any time.
FAQs about Recipes
How long does leftover Amish chicken last?
Yes. Store in the refrigerator for up to four days in an airtight container, or freeze for up to three months. Thaw overnight in the fridge before reheating.
How do I know the chicken is cooked through?
Use a digital thermometer inserted into the thickest part of the thigh without touching bone. It should read 165°F.
Tags
Amish Chicken
This Amish Chicken recipe makes perfectly juicy, tender, and flavorful steak every time! Serve with potatoes and a side salad for an unforgettable dinner in under 30 minutes.
Ingredients
Main
Garnish
Instructions
Preheat and prepare
Preheat the oven to 350°F and lightly spray a 9x13 baking dish with nonstick spray. Center the oven rack to promote even browning.
Whisk dry ingredients
In a medium shallow bowl, whisk together the flour, smoked paprika, kosher salt, garlic powder, onion powder, and cracked black pepper until evenly combined.
Dredge the chicken
Pat thighs dry, dredge skin side up in the seasoned flour, shaking off any excess, then arrange skin side up in the prepared baking dish with a little space between pieces.
Mix cream and water
Whisk together 1 1/4 cups cold heavy cream and 1 1/4 cups cold water until smooth. Keep cold to prevent early separation when heated.
Bake uncovered
Slowly pour the cream mixture into the baking dish around the thighs. Bake uncovered for 1 1/2 hours until the skin is golden and an inserted thermometer reads 165°F. Broil briefly if additional browning is desired.
Rest and make gravy
Allow the chicken to rest in the baking dish five minutes. Whisk the drippings and cream mixture into a smooth gravy, adjust seasoning, and spoon over the thighs.
Serve
Transfer to a serving plate, garnish with chopped parsley, and serve with your choice of sides such as mashed potatoes or egg noodles.
Last Step: Please leave a rating and comment letting us know how you liked this recipe! This helps our business to thrive and continue providing free, high-quality recipes for you.
Nutrition
Did You Make This?
Leave a comment & rating below or tag
@yumelle on social media!
Categories:
You might also like...

Chicken Parmesan Meatball Sliders
Juicy chicken meatballs baked with Parmesan and herbs, spooned with marinara, and covered in melty mozzarella on toasted slider rolls. Irresistible for parties.

Spooky Spaghetti Monster Meatballs
Twirl eerie-colored spaghetti and top it with gooey, cheese-stuffed monster meatballs complete with olive eyes for a delightfully spooky family dinner.

10-Minute Egg Drop Soup
Silky egg ribbons swirl through savory chicken broth, scented with sesame and scallions. Simple pantry staples, ready in just 10 minutes.
Did You Make This?
Leave a comment & rating below or tag @yumelle on social media!
Rate This Recipe
Share This Recipe
Enjoyed this recipe? Share it with friends and family, and don't forget to leave a review!
Comments (1)
This recipe looks amazing! Can't wait to try it.
Comments are stored locally in your browser. Server comments are displayed alongside your local comments.

Hi, I'm Hannah!
What's Popular

30-Minute Meals!
Join to receive our email series which contains a round-up of some of our quick and easy family favorite recipes.